<?xml version="1.0" encoding="utf-8"?><feed xmlns="http://www.w3.org/2005/Atom" xml:lang="ko"><generator uri="https://jekyllrb.com/" version="4.4.1">Jekyll</generator><link href="https://nninnis.github.io/feed.xml" rel="self" type="application/atom+xml" /><link href="https://nninnis.github.io/" rel="alternate" type="text/html" hreflang="ko" /><updated>2026-06-08T01:10:01+09:00</updated><id>https://nninnis.github.io/feed.xml</id><title type="html">nninnis.dev</title><subtitle>개발 기록</subtitle><author><name>nninnis</name></author><entry><title type="html">Claude Code vs Codex — 주력 에이전트를 뭘로 둘 것인가</title><link href="https://nninnis.github.io/claude-code/2026/06/08/claude-code-vs-codex-primary-agent/" rel="alternate" type="text/html" title="Claude Code vs Codex — 주력 에이전트를 뭘로 둘 것인가" /><published>2026-06-08T00:00:00+09:00</published><updated>2026-06-08T00:00:00+09:00</updated><id>https://nninnis.github.io/claude-code/2026/06/08/claude-code-vs-codex-primary-agent</id><content type="html" xml:base="https://nninnis.github.io/claude-code/2026/06/08/claude-code-vs-codex-primary-agent/"><![CDATA[<p>결론부터: 나는 Claude Code(Opus 4.8)를 주력으로 두고 Codex(GPT-5.5)를 플러그인으로 붙여 보조로 쓴다. Codex를 주력으로 두는 것도 똑같이 합리적인 선택이다. 갈리는 지점은 “벤치마크 점수”가 아니라 <strong>오케스트레이션 모델과 하네스 구조</strong>다. 이 글은 그 갈림길을 팩트 기준으로 정리한다.</p>

<p>이전 글(<a href="/claude-code/2026/05/07/claude-code-codex-plugin-workflow/">Codex 플러그인 실무 워크플로우</a>)에서 플러그인 <em>사용법</em>은 다뤘으니, 여기서는 “주력 도구로 뭘 고를까” 관점만 본다.</p>

<hr />

<h2 id="출발점--커서가-더-좋다는-오해">출발점 — “커서가 더 좋다”는 오해</h2>

<p>내가 Claude Code를 그렇게 권해도, 내 주변 사람들은 한동안 “커서가 더 좋다”며 Cursor를 놓지 않았다. 이유를 들여다보면 대부분 같은 오해 위에 서 있다.</p>

<ul>
  <li><strong>“커서에서 쓰는 Sonnet/Opus나 Claude Code에서 쓰는 거나 똑같은 모델 아니냐”</strong> — 모델 가중치는 같다. 하지만 같은 모델이라도 어떤 하네스(컨텍스트 주입, 툴 정의, 메모리, 후크)에 얹히느냐에 따라 결과물이 갈린다. 하네스 개념이 없으면 이 차이 자체가 안 보인다.</li>
  <li><strong>“커서는 여러 모델을 고를 수 있으니 Claude 모델만 쓰는 것보다 우월하다”</strong> — 모델 선택지 수가 곧 에이전트 성능은 아니다. 모델을 바꿔 끼우는 것과, 하네스를 그 모델에 맞게 깎는 것은 다른 레이어의 일이다.</li>
</ul>

<p>근본 원인은 하나다. <strong>모델 자체를 에이전트라고 생각하는 것.</strong> 컨텍스트 엔지니어링이라는 레이어가 있다는 걸 모르면, 도구 비교가 “어느 모델이 더 똑똑한가”로 납작해진다. 실제로 결과를 가르는 건 그 위에 얹힌 하네스인데도.</p>

<p>그래서 하네스를 의식하기 시작한 사람들은 IDE 안의 어시스턴트에서 <strong>CLI 기반 에이전트</strong>로 넘어간다. 그리고 그 종착지에서 다시 Claude Code와 Codex로 갈린다. 질문이 “Cursor냐 아니냐”에서 “클코냐 코덱스냐”로 바뀌는 지점이다.</p>

<hr />

<h2 id="먼저-짚을-것--두-도구는-한쪽-방향으로만-공식-연동된다">먼저 짚을 것 — 두 도구는 한쪽 방향으로만 공식 연동된다</h2>

<p>이게 의사결정에 생각보다 크게 작용한다. 2026년 6월 현재:</p>

<ul>
  <li><strong>Codex → Claude Code (공식 O):</strong> OpenAI가 <code class="language-plaintext highlighter-rouge">openai/codex-plugin-cc</code>를 2026년 3월 30일에 공식 배포했다. Claude Code 세션 안에서 슬래시 커맨드로 Codex에 리뷰·위임을 던질 수 있다. MCP 서버 방식이고, 로컬 <code class="language-plaintext highlighter-rouge">codex</code> 바이너리와 <code class="language-plaintext highlighter-rouge">config.toml</code>, 기존 MCP·샌드박스 설정을 그대로 상속한다.</li>
  <li><strong>Claude Code → Codex (공식 X):</strong> 반대로 Codex 세션 안에서 Claude Code를 공식 플러그인으로 붙이는 경로는 없다. 커뮤니티가 만든 비공식 “Claude plugin for Codex”가 있을 뿐이고, Codex가 Claude Code 마켓플레이스를 자동 미러링하다가 <code class="language-plaintext highlighter-rouge">${CLAUDE_PLUGIN_ROOT}</code> 치환을 못 해서 MCP 핸드셰이크가 깨지는 이슈도 보고돼 있다(openai/codex#19372).</li>
</ul>

<p>즉 <strong>Claude Code를 허브로 두면 Codex를 정식으로 흡수할 수 있지만, 반대는 매끄럽지 않다.</strong> 내가 클코를 주력에 두는 첫 번째 실무적 이유가 이거다. 두 모델을 다 쓰고 싶다면 허브는 클코가 유리하다.</p>

<hr />

<h2 id="모델-성능--벤치마크는-워크로드에-따라-갈린다">모델 성능 — 벤치마크는 워크로드에 따라 갈린다</h2>

<p>수치만 보면 한쪽 압승이 아니다. 출시일과 코딩 벤치마크를 정리하면:</p>

<table>
  <thead>
    <tr>
      <th>항목</th>
      <th>Claude Opus 4.8</th>
      <th>GPT-5.5</th>
    </tr>
  </thead>
  <tbody>
    <tr>
      <td>출시일</td>
      <td>2026-05-28</td>
      <td>2026-04-23 (API 4-24)</td>
    </tr>
    <tr>
      <td>SWE-Bench Verified</td>
      <td>88.6%</td>
      <td>—</td>
    </tr>
    <tr>
      <td>SWE-Bench Pro</td>
      <td><strong>69.2%</strong></td>
      <td>58.6%</td>
    </tr>
    <tr>
      <td>Terminal-Bench 2.1</td>
      <td>74.6%</td>
      <td><strong>78.2%</strong></td>
    </tr>
    <tr>
      <td>API 표준가 (in/out, /1M tok)</td>
      <td>$5 / $25</td>
      <td>$5 / $30</td>
    </tr>
  </tbody>
</table>

<p>해석:</p>

<ul>
  <li><strong>레포 단위 이슈 해결</strong>(모듈 경계를 넘는 멀티스텝 패치)은 Opus 4.8이 SWE-Bench Pro에서 10%p 이상 앞선다.</li>
  <li><strong>터미널 주도 에이전틱 코딩</strong>은 GPT-5.5가 Terminal-Bench 2.1에서 앞선다.</li>
</ul>

<p>한 가지 함정은 이 “터미널 강세”가 실제 사용 환경과 꼭 일치하지 않는다는 점이다. Terminal-Bench는 말 그대로 터미널 구동을 가정한 벤치마크지만, 정작 Codex를 쓰는 경우 상당수는 CLI가 아니라 <strong>Codex 데스크톱(GUI)</strong>으로 들어온다. CLI보다 GUI가 익숙한 사용자가 그만큼 많다는 뜻이고, 그러면 벤치마크가 측정한 강점이 실사용에선 그대로 안 살아날 수 있다.</p>

<p>벤치마크 수치는 모두 서드파티 측정치이고 측정 환경에 따라 흔들린다. 절대 점수보다 <strong>“내 워크로드가 레포 전반 리팩터링이냐, 터미널 자동화냐”</strong> 그리고 <strong>“나는 CLI로 굴리나, GUI로 굴리나”</strong>가 더 현실적인 판단 기준이다.</p>

<hr />

<h2 id="멀티-에이전트--서브에이전트--구조가-다르다">멀티 에이전트 / 서브에이전트 — 구조가 다르다</h2>

<p>오케스트레이션을 어떻게 하느냐가 실제 사용감을 가른다.</p>

<h3 id="claude-code">Claude Code</h3>

<ul>
  <li><strong>Subagents:</strong> 커스텀 프롬프트·툴·격리를 가진 재사용 에이전트 설정. 메인 세션이 워커로 호출한다.</li>
  <li><strong>Agent Teams</strong> (2026-02-05, Research Preview): 리드 에이전트가 전문 서브에이전트에게 병렬 위임. split-pane 모드를 켜면 각 팀원이 자기 pane을 갖고, 터미널에 따라 <strong>tmux / iTerm2를 자동 감지</strong>해 분할한다.</li>
  <li><strong>Agent View</strong> (2026-05-11, Research Preview): tmux 바둑판을 직접 깔지 않고도 여러 세션을 단일 리스트 대시보드 한 화면에서 관리. 클코 프로세스 상태를 직접 읽어 테이블로 반영한다.</li>
</ul>

<h3 id="codex">Codex</h3>

<ul>
  <li><strong>Subagents:</strong> explorer(읽기 전용 분석) / worker(읽기-쓰기 실행) / default(범용) 3가지 역할. 사용자가 명시적으로 요청할 때만 spawn하고, 최대 6개까지 동시 실행한다.</li>
  <li>설정은 <code class="language-plaintext highlighter-rouge">config.toml</code>의 <code class="language-plaintext highlighter-rouge">[agents]</code> 섹션에서: <code class="language-plaintext highlighter-rouge">max_threads = 6</code>(동시 스레드), <code class="language-plaintext highlighter-rouge">max_depth = 1</code>(중첩 깊이), <code class="language-plaintext highlighter-rouge">job_max_runtime_seconds = 300</code>. 모든 결과가 모일 때까지 기다렸다가 한 번에 통합 응답을 준다.</li>
</ul>

<p>차이를 한 줄로: <strong>클코는 “팀/뷰”라는 UI 레이어까지 얹어 다중 세션 관찰성을 챙겼고, 코덱스는 config 기반으로 빡세게 통제되는 병렬 워커에 가깝다.</strong> 여러 세션을 띄워놓고 상태를 눈으로 훑어야 하는 1인 멀티트랙 작업엔 클코의 Agent View가, 정해진 작업을 정확히 N개로 쪼개 돌리는 데는 코덱스의 명시적 서브에이전트가 손에 붙는다.</p>

<hr />

<h2 id="tmux-바둑판-에이전트-뷰--직접-깔-것인가-내장을-쓸-것인가">tmux 바둑판 에이전트 뷰 — 직접 깔 것인가, 내장을 쓸 것인가</h2>

<p>여러 에이전트를 동시에 띄워놓고 바둑판으로 보는 방식엔 두 갈래가 있다.</p>

<ol>
  <li><strong>직접 tmux 그리드:</strong> 세션마다 pane을 나눠 한 탭에 깔아두는 고전적 방법. 완전한 제어권을 갖지만 상태 추적은 수동이다.</li>
  <li><strong>클코 내장:</strong> Agent Teams의 split-pane(tmux/iTerm2 자동 감지) 또는 Agent View의 단일 대시보드.</li>
</ol>

<p>내 결론은 <strong>둘은 대체재가 아니라 보완재</strong>다. 자유도가 필요하고 비표준 프로세스까지 한 화면에 묶고 싶으면 직접 tmux가 낫고, “지금 어느 세션이 입력을 기다리는가”를 빠르게 보려면 Agent View가 낫다. 코덱스에는 이 관찰성 레이어가 클코만큼 정돈돼 있지 않아서, 코덱스로 다중 인스턴스를 CLI에서 굴리려면 결국 tmux를 직접 까는 쪽이 된다.</p>

<hr />

<h2 id="하네스-엔지니어링-관점">하네스 엔지니어링 관점</h2>

<p>모델 점수보다 오래 가는 차이는 <strong>하네스</strong>(컨텍스트 주입, 툴 정의, 메모리, 후크, 플러그인)다.</p>

<ul>
  <li><strong>Claude Code:</strong> <code class="language-plaintext highlighter-rouge">CLAUDE.md</code> + 스킬 + 플러그인 + 후크로 하네스를 세밀하게 조립할 수 있다. Codex 플러그인의 review gate(Stop Hook으로 응답마다 자동 리뷰)처럼, 하네스에 다른 모델을 끼워 넣는 것도 가능하다.</li>
  <li><strong>Codex:</strong> <code class="language-plaintext highlighter-rouge">config.toml</code> 중심으로 에이전트·샌드박스·스레드를 통제한다. 설정이 코드화돼 있어 재현성과 팀 공유가 깔끔하다.</li>
</ul>

<p>방향성이 다르다. 클코는 <strong>확장성과 조립</strong>, 코덱스는 <strong>선언적 통제와 재현성</strong> 쪽이다. 하네스를 직접 깎아 쓰는 걸 즐기면 클코, 설정을 못 박아 안정적으로 돌리고 싶으면 코덱스가 손에 맞는다.</p>

<hr />

<h2 id="비용">비용</h2>

<table>
  <thead>
    <tr>
      <th> </th>
      <th>Opus 4.8 표준</th>
      <th>GPT-5.5 표준</th>
    </tr>
  </thead>
  <tbody>
    <tr>
      <td>Input (/1M)</td>
      <td>$5</td>
      <td>$5</td>
    </tr>
    <tr>
      <td>Output (/1M)</td>
      <td>$25</td>
      <td>$30</td>
    </tr>
    <tr>
      <td>비고</td>
      <td>Fast Mode $10/$50</td>
      <td>Batch 50% 할인, Pro 티어 $30/$180</td>
    </tr>
  </tbody>
</table>

<p>API 단가는 입력 동일, 출력은 Opus가 약간 싸다. 다만 나처럼 Claude Max + ChatGPT Plus 구독으로 쓰면 토큰 단가보다 <strong>플랜 한도와 사용량 소진 속도</strong>가 체감 비용을 좌우한다. 특히 클코에서 Codex review gate를 켜면 Claude↔Codex 루프가 길어져 양쪽 사용량이 동시에 빠진다(이전 글에서 경고한 그대로다).</p>

<hr />

<h2 id="정리--누가-뭘-주력으로-둬야-하나">정리 — 누가 뭘 주력으로 둬야 하나</h2>

<ul>
  <li><strong>Claude Code 주력이 맞는 사람:</strong> 레포 전반을 넘나드는 리팩터링·마이그레이션이 잦고, 여러 세션 관찰성과 하네스 커스터마이징을 중시하고, 두 모델을 한 허브에서 섞고 싶은 경우. (= 내 케이스)</li>
  <li><strong>Codex 주력이 맞는 사람:</strong> 터미널 주도 자동화 비중이 크거나 반대로 GUI 워크플로가 편하고, 선언적 config로 재현성 있게 묶고 싶고, GPT 계열 모델 성향이 손에 맞는 경우.</li>
</ul>

<p>핵심은 <strong>공식 연동이 단방향(Codex→클코)이라, 두 모델을 다 쓸 거면 허브는 클코가 유리하다</strong>는 점이다. 한쪽만 깔끔하게 쓸 거라면 워크로드(레포 단위냐 터미널 단위냐)로 고르면 된다. 벤치마크 1~2점 차이로 고를 문제가 아니다.</p>

<hr />

<p>Sources:</p>
<ul>
  <li><a href="https://github.com/openai/codex-plugin-cc">openai/codex-plugin-cc (GitHub)</a></li>
  <li><a href="https://community.openai.com/t/introducing-codex-plugin-for-claude-code/1378186">Introducing Codex Plugin for Claude Code (OpenAI Developer Community)</a></li>
  <li><a href="https://github.com/openai/codex/issues/19372">Codex auto-mirrors Claude Code marketplaces — MCP handshake issue (openai/codex#19372)</a></li>
  <li><a href="https://developers.openai.com/codex/subagents">Subagents — Codex (OpenAI Developers)</a></li>
  <li><a href="https://code.claude.com/docs/en/agent-teams">Orchestrate teams of Claude Code sessions (Claude Code Docs)</a></li>
  <li><a href="https://www.datacamp.com/blog/claude-opus-4-8-vs-gpt-5-5">Claude Opus 4.8 vs GPT-5.5: Benchmarks &amp; Pricing (DataCamp)</a></li>
  <li><a href="https://www.cloudzero.com/blog/claude-opus-4-8-pricing/">Claude Opus 4.8 Pricing (CloudZero)</a></li>
  <li><a href="https://apidog.com/blog/gpt-5-5-pricing/">GPT-5.5 Pricing (apidog)</a></li>
</ul>]]></content><author><name>nninnis</name></author><category term="claude-code" /><summary type="html"><![CDATA[결론부터: 나는 Claude Code(Opus 4.8)를 주력으로 두고 Codex(GPT-5.5)를 플러그인으로 붙여 보조로 쓴다. Codex를 주력으로 두는 것도 똑같이 합리적인 선택이다. 갈리는 지점은 “벤치마크 점수”가 아니라 오케스트레이션 모델과 하네스 구조다. 이 글은 그 갈림길을 팩트 기준으로 정리한다.]]></summary></entry><entry><title type="html">Claude Code Remote Control - 내 머신 세션을 폰과 브라우저로 이어 쓰는 법</title><link href="https://nninnis.github.io/claude-code/2026/05/26/claude-code-remote-control/" rel="alternate" type="text/html" title="Claude Code Remote Control - 내 머신 세션을 폰과 브라우저로 이어 쓰는 법" /><published>2026-05-26T00:00:00+09:00</published><updated>2026-05-26T00:00:00+09:00</updated><id>https://nninnis.github.io/claude-code/2026/05/26/claude-code-remote-control</id><content type="html" xml:base="https://nninnis.github.io/claude-code/2026/05/26/claude-code-remote-control/"><![CDATA[<p>결론부터 말하면 Remote Control은 클라우드 실행이 아니다. 내 노트북에서 돌고 있는 <code class="language-plaintext highlighter-rouge">claude</code> 프로세스를 폰이나 다른 브라우저에서 그대로 조종하는 기능이다. 세션은 로컬에 남아 있고, 웹/모바일은 그 세션을 들여다보는 창일 뿐이다.</p>

<p>리서치 프리뷰 단계지만 Pro/Max 사용자라면 바로 켜볼 수 있다. 직접 며칠 써보고 한계까지 같이 정리한다.</p>

<hr />

<h2 id="이게-푸는-문제-못-푸는-문제">이게 푸는 문제, 못 푸는 문제</h2>

<p><strong>푸는 문제</strong></p>

<ul>
  <li>책상에서 시작한 세션을 외출 중에 폰으로 이어가기</li>
  <li>회의실 노트북 옆에서 폰으로 메시지 한 줄 던지기</li>
  <li>로컬 MCP, CLAUDE.md, <code class="language-plaintext highlighter-rouge">.env</code> 같은 환경을 그대로 들고 가기</li>
</ul>

<p><strong>못 푸는 문제</strong></p>

<ul>
  <li>노트북 끄고 출근하기 → 로컬 프로세스 죽으면 끝</li>
  <li>인터랙티브 picker가 필요한 명령 (<code class="language-plaintext highlighter-rouge">/mcp</code>, <code class="language-plaintext highlighter-rouge">/plugin</code>, <code class="language-plaintext highlighter-rouge">/resume</code>) 원격 조작</li>
  <li>API 키만 가진 환경에서 쓰기 → claude.ai OAuth 로그인 필수</li>
</ul>

<p>클라우드에서 통째로 돌리고 싶으면 그건 <a href="https://code.claude.com/docs/en/claude-code-on-the-web">Claude Code on the web</a> 영역이다. Remote Control은 어디까지나 <strong>내 머신을 원격 조종하는 채널</strong>이다.</p>

<hr />

<h2 id="작동-원리--outbound-polling">작동 원리 — Outbound Polling</h2>

<p>핵심은 inbound 포트를 열지 않는다는 점이다.</p>

<div class="language-plaintext highlighter-rouge"><div class="highlight"><pre class="highlight"><code>내 노트북                       Anthropic API                 폰 / 브라우저
   │                                 │                              │
   │  outbound HTTPS (polling)       │                              │
   ├────────────────────────────────►│                              │
   │                                 │◄─────────────────────────────┤
   │                                 │     메시지 입력              │
   │◄────────────────────────────────┤                              │
   │   작업 지시 수신                │                              │
   │                                 │                              │
   │  결과 push                      │                              │
   ├────────────────────────────────►├─────────────────────────────►│
</code></pre></div></div>

<p>내 머신이 Anthropic API에 폴링하면서 일감을 받아간다. 방화벽 뚫을 필요 없고, 포트포워딩도 없고, ngrok도 없다. TLS 위에서 짧은 수명의 자격증명이 목적별로 따로 발급된다.</p>

<hr />

<h2 id="활성화-조건">활성화 조건</h2>

<table>
  <thead>
    <tr>
      <th>항목</th>
      <th>요구사항</th>
    </tr>
  </thead>
  <tbody>
    <tr>
      <td><strong>버전</strong></td>
      <td>Claude Code v2.1.51 이상 (<code class="language-plaintext highlighter-rouge">claude --version</code>으로 확인)</td>
    </tr>
    <tr>
      <td><strong>플랜</strong></td>
      <td>Pro, Max, Team, Enterprise — Team/Enterprise는 관리자가 admin settings에서 토글 ON 필요</td>
    </tr>
    <tr>
      <td><strong>인증</strong></td>
      <td>claude.ai OAuth 로그인 필수. <code class="language-plaintext highlighter-rouge">claude setup-token</code>이나 <code class="language-plaintext highlighter-rouge">CLAUDE_CODE_OAUTH_TOKEN</code>으로 발급한 inference-only 토큰은 불가</td>
    </tr>
    <tr>
      <td><strong>환경변수</strong></td>
      <td><code class="language-plaintext highlighter-rouge">ANTHROPIC_API_KEY</code> 설정돼 있으면 unset해야 함</td>
    </tr>
    <tr>
      <td><strong>워크스페이스</strong></td>
      <td>프로젝트 디렉토리에서 <code class="language-plaintext highlighter-rouge">claude</code> 한 번 실행해서 trust dialog 수락</td>
    </tr>
    <tr>
      <td><strong>로컬 프로세스</strong></td>
      <td>세션 동안 노트북 깨어 있어야 함 (sleep은 자동 재연결, 네트워크 끊김 약 10분 넘으면 타임아웃 후 프로세스 종료)</td>
    </tr>
    <tr>
      <td><strong>호환 안 되는 백엔드</strong></td>
      <td><code class="language-plaintext highlighter-rouge">CLAUDE_CODE_USE_BEDROCK</code>, <code class="language-plaintext highlighter-rouge">CLAUDE_CODE_USE_VERTEX</code>, <code class="language-plaintext highlighter-rouge">CLAUDE_CODE_USE_FOUNDRY</code> 등 서드파티 프로바이더 사용 시 동작 안 함</td>
    </tr>
  </tbody>
</table>

<p>API 키로 Claude Code 쓰던 환경이라면 한 번은 <code class="language-plaintext highlighter-rouge">claude auth login</code>으로 claude.ai OAuth 로그인 거쳐야 한다.</p>

<hr />

<h2 id="시작-방법--세-가지-모드">시작 방법 — 세 가지 모드</h2>

<h3 id="1-서버-모드-병렬-세션-가능">1. 서버 모드 (병렬 세션 가능)</h3>

<div class="language-bash highlighter-rouge"><div class="highlight"><pre class="highlight"><code>claude remote-control
</code></pre></div></div>

<p>터미널이 서버 모드로 대기 상태에 들어간다. 세션 URL이 표시되고, 스페이스바를 누르면 QR 코드가 토글된다. 폰 카메라로 QR 찍으면 Claude 앱에서 바로 열린다.</p>

<p>주요 플래그:</p>

<table>
  <thead>
    <tr>
      <th>플래그</th>
      <th>동작</th>
    </tr>
  </thead>
  <tbody>
    <tr>
      <td><code class="language-plaintext highlighter-rouge">--name "My Project"</code></td>
      <td>claude.ai/code 세션 목록에 보일 제목</td>
    </tr>
    <tr>
      <td><code class="language-plaintext highlighter-rouge">--spawn same-dir</code></td>
      <td>기본값. 모든 원격 세션이 동일한 작업 디렉토리 공유 (파일 충돌 가능)</td>
    </tr>
    <tr>
      <td><code class="language-plaintext highlighter-rouge">--spawn worktree</code></td>
      <td>원격에서 새 세션 만들 때마다 별도 git worktree 생성. git 저장소 필요</td>
    </tr>
    <tr>
      <td><code class="language-plaintext highlighter-rouge">--spawn session</code></td>
      <td>단일 세션 모드. 추가 연결 거부. 시작 시점에만 지정 가능</td>
    </tr>
    <tr>
      <td><code class="language-plaintext highlighter-rouge">--capacity N</code></td>
      <td>동시 세션 수 (기본 32). <code class="language-plaintext highlighter-rouge">--spawn=session</code>과 함께 못 씀</td>
    </tr>
    <tr>
      <td><code class="language-plaintext highlighter-rouge">--sandbox</code> / <code class="language-plaintext highlighter-rouge">--no-sandbox</code></td>
      <td>파일시스템/네트워크 격리 토글. 기본 OFF</td>
    </tr>
    <tr>
      <td><code class="language-plaintext highlighter-rouge">--verbose</code></td>
      <td>상세 연결 로그</td>
    </tr>
  </tbody>
</table>

<p>런타임에 <code class="language-plaintext highlighter-rouge">w</code> 키 누르면 <code class="language-plaintext highlighter-rouge">same-dir</code> ↔ <code class="language-plaintext highlighter-rouge">worktree</code> 전환 가능하다.</p>

<h3 id="2-인터랙티브--원격-동시">2. 인터랙티브 + 원격 동시</h3>

<div class="language-bash highlighter-rouge"><div class="highlight"><pre class="highlight"><code>claude <span class="nt">--remote-control</span>
<span class="c"># 또는 짧게</span>
claude <span class="nt">--rc</span>
</code></pre></div></div>

<p>평소처럼 터미널에서 채팅하면서 동시에 원격에서도 같은 세션에 접속 가능한 모드다. 책상에 앉아서 일하다가 자리 비울 때 폰으로 이어받는 시나리오에 어울린다.</p>

<div class="language-bash highlighter-rouge"><div class="highlight"><pre class="highlight"><code>claude <span class="nt">--remote-control</span> <span class="s2">"My Project"</span>
</code></pre></div></div>

<p>이름 인자도 받는다.</p>

<h3 id="3-진행-중인-세션에-붙이기">3. 진행 중인 세션에 붙이기</h3>

<p>이미 세션에 들어와 있는 상태라면 슬래시 명령으로 변환 가능하다.</p>

<div class="language-text highlighter-rouge"><div class="highlight"><pre class="highlight"><code>/remote-control
/rc My Project
</code></pre></div></div>

<p>기존 대화 히스토리를 그대로 가져간다. 단, 이 방식은 <code class="language-plaintext highlighter-rouge">--verbose</code>, <code class="language-plaintext highlighter-rouge">--sandbox</code>, <code class="language-plaintext highlighter-rouge">--no-sandbox</code> 플래그를 못 받는다.</p>

<h3 id="4-vs-code-확장-v2179-이상">4. VS Code 확장 (v2.1.79 이상)</h3>

<p>VS Code 프롬프트 박스에서 <code class="language-plaintext highlighter-rouge">/remote-control</code> 또는 <code class="language-plaintext highlighter-rouge">/rc</code>. 배너에 상태가 뜨고, <strong>Open in browser</strong>로 바로 이동할 수 있다. CLI와 달리 이름 인자나 QR 코드는 지원 안 한다.</p>

<h3 id="모든-세션에-자동으로-켜기">모든 세션에 자동으로 켜기</h3>

<div class="language-text highlighter-rouge"><div class="highlight"><pre class="highlight"><code>/config
</code></pre></div></div>

<p>→ <strong>Enable Remote Control for all sessions</strong> = true.</p>

<p>이렇게 하면 매 인터랙티브 세션이 자동으로 원격 세션 1개씩 등록한다. Desktop 앱은 <strong>Settings → Claude Code → Enable remote control by default</strong>에서도 토글 가능하다.</p>

<hr />

<h2 id="클라이언트-매트릭스">클라이언트 매트릭스</h2>

<table>
  <thead>
    <tr>
      <th>클라이언트</th>
      <th>연결 방식</th>
      <th>비고</th>
    </tr>
  </thead>
  <tbody>
    <tr>
      <td>브라우저 (claude.ai/code)</td>
      <td>세션 URL 직접 열거나 세션 목록에서 선택</td>
      <td>공식 지원</td>
    </tr>
    <tr>
      <td>Claude iOS 앱</td>
      <td>QR 스캔 또는 Code 탭 → 세션 목록</td>
      <td>공식 지원</td>
    </tr>
    <tr>
      <td>Claude Android 앱</td>
      <td>동일</td>
      <td>공식 지원</td>
    </tr>
    <tr>
      <td>VS Code 확장</td>
      <td><code class="language-plaintext highlighter-rouge">/rc</code>로 자기 세션을 원격 등록 (호스트로 동작)</td>
      <td>공식 지원</td>
    </tr>
    <tr>
      <td>Claude Desktop 앱</td>
      <td>Settings → Claude Code → Enable remote control by default 토글로 활성화</td>
      <td><strong>클라이언트로 접속 가능</strong> (공식 문서 명시). 단, Desktop 앱 자체를 호스트로 세션을 시작하는 건 현재 불가 (알려진 미지원 사항)</td>
    </tr>
  </tbody>
</table>

<p>세션 목록에서 원격 세션은 컴퓨터 아이콘 + 초록 점으로 표시된다.</p>

<p>폰에 앱이 없다면 세션 안에서 <code class="language-plaintext highlighter-rouge">/mobile</code> 치면 다운로드 QR이 뜬다.</p>

<hr />

<h2 id="로컬-환경이-그대로-따라가는가">로컬 환경이 그대로 따라가는가</h2>

<p>이게 클라우드 실행과의 결정적 차이다.</p>

<table>
  <thead>
    <tr>
      <th>항목</th>
      <th>Remote Control</th>
      <th>Claude Code on the web</th>
    </tr>
  </thead>
  <tbody>
    <tr>
      <td>파일시스템</td>
      <td>내 로컬 그대로</td>
      <td>클라우드 컨테이너</td>
    </tr>
    <tr>
      <td>MCP 서버</td>
      <td>로컬 설정 그대로</td>
      <td>별도 설정 필요</td>
    </tr>
    <tr>
      <td><code class="language-plaintext highlighter-rouge">CLAUDE.md</code></td>
      <td>로컬 프로젝트 그대로</td>
      <td>클라우드 환경 기준</td>
    </tr>
    <tr>
      <td><code class="language-plaintext highlighter-rouge">.env</code>, 시크릿</td>
      <td>로컬 환경변수 그대로</td>
      <td>별도 주입 필요</td>
    </tr>
    <tr>
      <td><code class="language-plaintext highlighter-rouge">@</code> 파일 자동완성</td>
      <td>로컬 프로젝트 경로</td>
      <td>클라우드 워크스페이스</td>
    </tr>
    <tr>
      <td>설치된 도구/CLI</td>
      <td>내 머신에 깔린 거 전부</td>
      <td>컨테이너 이미지 한정</td>
    </tr>
    <tr>
      <td>데이터 이동</td>
      <td>코드/파일 클라우드로 안 감</td>
      <td>클라우드에서 실행</td>
    </tr>
  </tbody>
</table>

<p>회사 보안 정책이 빡세서 코드가 클라우드 컨테이너로 못 나가는 환경이라면 Remote Control이 거의 유일한 외부 조작 옵션이다.</p>

<hr />

<h2 id="tmux와-결합--실무-영속-세팅">tmux와 결합 — 실무 영속 세팅</h2>

<p><code class="language-plaintext highlighter-rouge">claude remote-control</code>은 터미널 프로세스가 죽으면 끝난다. 외출하면서 노트북 ssh로 접속해서 다시 띄울 수도 있지만 매번 번거롭다. tmux로 영속화해두면 깔끔하다.</p>

<div class="language-bash highlighter-rouge"><div class="highlight"><pre class="highlight"><code><span class="c"># 세션 시작</span>
tmux new <span class="nt">-s</span> rc
<span class="nb">cd</span> ~/projects/my-app
claude remote-control <span class="nt">--name</span> <span class="s2">"my-app"</span> <span class="nt">--spawn</span> worktree

<span class="c"># Ctrl-b d 로 detach</span>
<span class="c"># 노트북 닫지 않고 외출</span>

<span class="c"># 돌아와서 attach</span>
tmux attach <span class="nt">-t</span> rc
</code></pre></div></div>

<p>ssh로 자기 머신에 들어가서 attach 하는 흐름까지 갖춰두면 모바일에서 세션 끊겼을 때 복구가 빠르다. 세션 명명은 <code class="language-plaintext highlighter-rouge">--name</code> 일관되게 쓰는 게 낫다 — 휴대폰 세션 목록에서 헷갈리는 게 의외로 큰 마찰이다.</p>

<p>토큰을 아끼면서 긴 세션을 끌고 가는 노하우는 <a href="/claude-code/2026/02/14/claude-code-token-saving/">Claude Code 토큰 절약 실전 가이드</a>에 따로 정리해뒀다. 원격에서 폰으로 끄적이는 메시지가 의외로 컨텍스트를 빠르게 갉아먹기 때문에, <code class="language-plaintext highlighter-rouge">/compact</code>나 <code class="language-plaintext highlighter-rouge">/clear</code>를 원격에서도 쓸 수 있다는 점을 적극 활용하는 게 좋다.</p>

<hr />

<h2 id="다른-원격-접근법과의-비교">다른 원격 접근법과의 비교</h2>

<table>
  <thead>
    <tr>
      <th>방식</th>
      <th>Trigger</th>
      <th>실행 위치</th>
      <th>셋업</th>
      <th>어울리는 케이스</th>
    </tr>
  </thead>
  <tbody>
    <tr>
      <td><strong>Remote Control</strong></td>
      <td>claude.ai/code, 모바일 앱에서 메시지</td>
      <td>내 머신</td>
      <td><code class="language-plaintext highlighter-rouge">claude remote-control</code></td>
      <td>진행 중 작업을 다른 기기에서 조종</td>
    </tr>
    <tr>
      <td>Dispatch</td>
      <td>모바일 앱에서 태스크 보내기</td>
      <td>내 머신 (Desktop)</td>
      <td>Desktop ↔ 모바일 페어링</td>
      <td>외출 중 작업 위임, 셋업 최소</td>
    </tr>
    <tr>
      <td>Claude Code on the web</td>
      <td>브라우저에서 태스크 시작</td>
      <td>클라우드</td>
      <td>별도 셋업 거의 없음</td>
      <td>클론도 안 한 레포에서 작업, 병렬 태스크</td>
    </tr>
    <tr>
      <td>SSH + tmux로 자기 노트북 접속</td>
      <td>폰 SSH 클라이언트</td>
      <td>내 머신</td>
      <td>DDNS, 키 관리, 방화벽</td>
      <td>자유도 최대지만 셋업 무거움</td>
    </tr>
    <tr>
      <td>Channels (Telegram/Discord)</td>
      <td>외부 채팅 이벤트</td>
      <td>내 머신</td>
      <td>채널 플러그인 설치</td>
      <td>CI 실패 알림 등 이벤트 기반</td>
    </tr>
  </tbody>
</table>

<p><strong>고르는 기준</strong></p>

<ul>
  <li>진행 중인 작업을 폰으로 잠깐 이어가려는 거면 → Remote Control</li>
  <li>노트북도 안 켜고 클라우드에서 돌리고 싶다 → Claude Code on the web</li>
  <li>SSH 키랑 DDNS 다 갖췄고 자유도가 필요하다 → SSH + tmux</li>
</ul>

<p><a href="/claude-code/2026/05/16/claude-code-agent-teams/">Claude Code 에이전트 협력사와 일하기</a>에서 다뤘던 멀티 에이전트 구성을 원격에서 조종하고 싶을 때는 Remote Control + <code class="language-plaintext highlighter-rouge">--spawn worktree</code>가 짝이 맞는다. 서브에이전트 워크트리들이 충돌하지 않게 분리되니까.</p>

<hr />

<h2 id="한계와-함정">한계와 함정</h2>

<p>솔직하게 정리한다.</p>

<h3 id="1-로컬-프로세스-죽으면-끝">1. 로컬 프로세스 죽으면 끝</h3>

<p>터미널 닫거나 노트북 셧다운하면 세션 종료. sleep은 괜찮지만 셧다운/터미널 종료는 회복 불가다. tmux로 백업 띄워두는 게 사실상 필수.</p>

<h3 id="2-약-10분-네트워크-타임아웃">2. 약 10분 네트워크 타임아웃</h3>

<p>머신이 깨어 있는데 네트워크만 약 10분 이상 끊기면 프로세스가 알아서 종료된다. 카페에서 노트북 두고 나갔는데 와이파이 끊긴 시나리오에서 당한다. 다시 <code class="language-plaintext highlighter-rouge">claude remote-control</code>로 재시작 필요.</p>

<h3 id="3-인터랙티브-picker-명령-로컬-전용">3. 인터랙티브 picker 명령 로컬 전용</h3>

<table>
  <thead>
    <tr>
      <th>원격에서 가능</th>
      <th>로컬에서만 가능</th>
    </tr>
  </thead>
  <tbody>
    <tr>
      <td><code class="language-plaintext highlighter-rouge">/compact</code></td>
      <td><code class="language-plaintext highlighter-rouge">/mcp</code></td>
    </tr>
    <tr>
      <td><code class="language-plaintext highlighter-rouge">/clear</code></td>
      <td><code class="language-plaintext highlighter-rouge">/plugin</code></td>
    </tr>
    <tr>
      <td><code class="language-plaintext highlighter-rouge">/context</code></td>
      <td><code class="language-plaintext highlighter-rouge">/resume</code></td>
    </tr>
    <tr>
      <td><code class="language-plaintext highlighter-rouge">/usage</code></td>
      <td> </td>
    </tr>
    <tr>
      <td><code class="language-plaintext highlighter-rouge">/exit</code></td>
      <td> </td>
    </tr>
    <tr>
      <td><code class="language-plaintext highlighter-rouge">/usage-credits</code></td>
      <td> </td>
    </tr>
    <tr>
      <td><code class="language-plaintext highlighter-rouge">/recap</code></td>
      <td> </td>
    </tr>
    <tr>
      <td><code class="language-plaintext highlighter-rouge">/reload-plugins</code></td>
      <td> </td>
    </tr>
  </tbody>
</table>

<p>MCP 서버 새로 붙이거나 플러그인 설치하는 작업은 폰에서 못 한다. 외출 중 환경 재구성은 안 된다는 뜻이다.</p>

<h3 id="4-ultraplan-시작하면-끊긴다">4. Ultraplan 시작하면 끊긴다</h3>

<p><code class="language-plaintext highlighter-rouge">ultraplan</code> 세션을 시작하는 순간 Remote Control 연결이 끊긴다. claude.ai/code 인터페이스를 둘이 동시에 못 쓰는 구조 때문이다. 외출 중 ultraplan 띄울 거면 미리 결정해야 한다.</p>

<h3 id="5-모바일-키보드의-현실">5. 모바일 키보드의 현실</h3>

<p>폰에서 긴 프롬프트 작성은 솔직히 고역이다. 짧은 지시(“계속 진행”, “이쪽으로 가지 마”, “리뷰 결과 정리해줘”) 위주로 굴리고, 본격 작업은 데스크탑에서 한다. 음성 입력이 의외로 쓸 만하지만 코드 토큰 인식은 여전히 거칠다.</p>

<h3 id="6-한-프로세스당-원격-세션-1개">6. 한 프로세스당 원격 세션 1개</h3>

<p>서버 모드(<code class="language-plaintext highlighter-rouge">claude remote-control</code>)가 아닌 일반 모드(<code class="language-plaintext highlighter-rouge">claude --rc</code>)에서는 프로세스당 원격 세션 1개로 제한된다. 한 머신에서 여러 프로젝트를 병렬로 원격 조작하려면 서버 모드를 쓰거나 프로세스를 여러 개 띄워야 한다.</p>

<h3 id="7-teamenterprise-기본-off">7. Team/Enterprise 기본 OFF</h3>

<p>회사 계정이면 관리자가 admin settings에서 토글 켜기 전엔 못 쓴다. 데이터 보존 정책에 따라 토글 자체가 회색 처리되어 있을 수도 있다.</p>

<hr />

<h2 id="실무-워크플로우-예시">실무 워크플로우 예시</h2>

<h3 id="시나리오-a-외출-전-활성화">시나리오 A: 외출 전 활성화</h3>

<div class="language-bash highlighter-rouge"><div class="highlight"><pre class="highlight"><code><span class="c"># 출근 전 책상에서</span>
<span class="nb">cd</span> ~/projects/my-shop
tmux new <span class="nt">-s</span> rc-shop
claude remote-control <span class="nt">--name</span> <span class="s2">"shop-prod-fix"</span> <span class="nt">--spawn</span> worktree

<span class="c"># Ctrl-b d 로 detach</span>
<span class="c"># 노트북 그대로 두고 외근</span>
</code></pre></div></div>

<p>지하철에서 폰으로 claude.ai/code 열어서 “어제 그 결제 버그 재현 테스트 작성해줘” 한 줄. 회사 도착해서 결과 확인.</p>

<h3 id="시나리오-b-회의-중-백그라운드-지시">시나리오 B: 회의 중 백그라운드 지시</h3>

<p>회의실에서 노트북으로 발표하면서 폰으로 “방금 받은 피드백대로 인보이스 PDF 레이아웃 수정 시작해줘”를 메시지 하나로 던지기. 회의 끝나고 노트북 돌아오면 diff가 준비돼 있다.</p>

<h3 id="시나리오-c-침대에서-마무리">시나리오 C: 침대에서 마무리</h3>

<p>저녁에 침대에서 폰으로 “오늘 PR 리뷰 코멘트 다 반영했나 확인하고, 안 됐으면 정리해서 알려줘”. 결과 보고 OK면 푸시 알림 켜놓고 잠들기 (<code class="language-plaintext highlighter-rouge">/config</code> → <strong>Push when Claude decides</strong>, v2.1.110 이상 필요).</p>

<hr />

<h2 id="정리">정리</h2>

<p>Remote Control은 <strong>로컬 세션을 다른 기기로 연장하는 채널</strong>이다. 클라우드 실행 대안이 아니라, 내 머신에 묶여 있던 Claude Code를 시공간적으로 자유롭게 만드는 기능에 가깝다.</p>

<table>
  <thead>
    <tr>
      <th>적합</th>
      <th>부적합</th>
    </tr>
  </thead>
  <tbody>
    <tr>
      <td>로컬 환경 그대로 외부에서 조작</td>
      <td>노트북 끄고 클라우드에서 돌리고 싶음</td>
    </tr>
    <tr>
      <td>MCP/CLAUDE.md/시크릿이 로컬에 있음</td>
      <td>모바일에서 긴 프롬프트 자주 작성</td>
    </tr>
    <tr>
      <td>Pro/Max 플랜, claude.ai OAuth 로그인</td>
      <td>API 키 기반 환경</td>
    </tr>
    <tr>
      <td>짧은 외출, 회의 중 백그라운드 지시</td>
      <td>며칠 단위 자리 비움 (네트워크/프로세스 끊김 리스크)</td>
    </tr>
    <tr>
      <td>tmux 운영에 익숙함</td>
      <td>환경 재구성(MCP, 플러그인 설치) 원격으로 필요</td>
    </tr>
  </tbody>
</table>

<p>리서치 프리뷰라 깔끔하지 않은 부분이 있다. GitHub 이슈 트래커에 서버 모드 worktree 관련 버그도 올라와 있다 (#45975). 핵심 기능은 충분히 쓸 만하지만, <strong>로컬 프로세스가 죽으면 끝</strong>이라는 본질적 제약은 인지하고 들어가야 한다.</p>

<hr />

<h2 id="출처">출처</h2>

<ul>
  <li><a href="https://code.claude.com/docs/en/remote-control">Claude Code Remote Control 공식 문서</a> — 모든 플래그/명령/제약 1차 확인</li>
  <li><a href="https://docs.anthropic.com/en/docs/claude-code/remote-control">docs.anthropic.com Remote Control 미러</a> — 동일 문서로 리다이렉트</li>
  <li><a href="https://code.claude.com/docs/en/desktop">Claude Code Desktop 공식 문서</a> — Desktop 앱의 Dispatch/Code 탭 역할 확인</li>
  <li><a href="https://wmedia.es/en/tips/claude-code-remote-control-from-phone">How to Control Claude Code from Your Phone — wmedia.es</a> — 서버 모드 동작 교차 확인</li>
  <li><a href="https://github.com/anthropics/claude-code/issues/45975">GitHub Issue #45975 — Server mode session creation 400</a> — 알려진 버그 참조</li>
</ul>]]></content><author><name>nninnis</name></author><category term="claude-code" /><summary type="html"><![CDATA[결론부터 말하면 Remote Control은 클라우드 실행이 아니다. 내 노트북에서 돌고 있는 claude 프로세스를 폰이나 다른 브라우저에서 그대로 조종하는 기능이다. 세션은 로컬에 남아 있고, 웹/모바일은 그 세션을 들여다보는 창일 뿐이다.]]></summary></entry><entry><title type="html">Claude Code Agent Teams — 하네스 엔지니어링 실전</title><link href="https://nninnis.github.io/claude-code/2026/05/16/claude-code-agent-teams/" rel="alternate" type="text/html" title="Claude Code Agent Teams — 하네스 엔지니어링 실전" /><published>2026-05-16T00:00:00+09:00</published><updated>2026-05-16T00:00:00+09:00</updated><id>https://nninnis.github.io/claude-code/2026/05/16/claude-code-agent-teams</id><content type="html" xml:base="https://nninnis.github.io/claude-code/2026/05/16/claude-code-agent-teams/"><![CDATA[<p>요즘 AI 판에서 ‘하네스 엔지니어링’이라는 말이 돌고 있다. 인터넷 어딘가에서 한 번씩은 스쳐가는 그 단어. 알고 쓰면 무기, 모르고 쓰면 장식이다. 정확히 뭔지, Claude Code Agent Teams로 직접 써보면서 정리했다.</p>

<hr />

<h2 id="하네스-엔지니어링이-뭔가">하네스 엔지니어링이 뭔가</h2>

<p>공식 정의: <strong>Agent = Model + Harness</strong>. HashiCorp 창업자 Mitchell Hashimoto가 2026년 2월에 정의했다.</p>

<p>모델(Claude, GPT-4)은 내가 바꿀 수 없다. 하네스(Harness)는 그 모델을 감싸는 모든 것이다.</p>

<ul>
  <li><strong>CLAUDE.md</strong> — 시스템 프롬프트 + 프로젝트 컨텍스트</li>
  <li><strong>에이전트 정의 파일</strong> — 역할, 허용 도구, 모델 선택 (<code class="language-plaintext highlighter-rouge">~/.claude/agents/architect.md</code> 같은 것들)</li>
  <li><strong>스킬 파일</strong> — 워크플로우 자동화, 참조 문서</li>
  <li><strong>툴 권한 설정</strong> — 어떤 도구를 허용/차단할지</li>
  <li><strong>피드백 루프</strong> — 훅(<code class="language-plaintext highlighter-rouge">TaskCompleted</code>, <code class="language-plaintext highlighter-rouge">TeammateIdle</code>), 회의록 자동 누적</li>
  <li><strong>실행 환경</strong> — tmux 분할, worktree 격리</li>
</ul>

<p>이걸 의도적으로 설계하는 게 하네스 엔지니어링이다.</p>

<p>프롬프트 엔지니어링 → 컨텍스트 엔지니어링 → 하네스 엔지니어링 순으로 개념이 진화했다. 프롬프트 하나 잘 쓰는 게 아니라, 모델이 작동하는 환경 전체를 구조화하는 방향으로.</p>

<p><strong>자주 보이는 오해</strong>: 하네스 엔지니어링을 에이전트 팀 구성이랑 같은 걸로 본다. 용어는 최신인데 이해가 에이전트 팀 하나에 멈춰 있는 경우다. Agent Teams(<code class="language-plaintext highlighter-rouge">TeamCreate</code>)는 하네스를 구현하는 방법 중 하나다. 단일 Claude Code 세션의 CLAUDE.md 하나만 잘 설계해도 하네스 엔지니어링이다. 팀 없이도 성립한다.</p>

<p>Agent Teams는 하네스 엔지니어링에서 <strong>분산 실행 레이어</strong>를 담당한다. 역할 분리, 컨텍스트 격리, 파일 소유권 매트릭스가 실제로 여러 에이전트 실행에 투영되는 모습이다.</p>

<hr />

<h2 id="agent-teams란">Agent Teams란</h2>

<p><code class="language-plaintext highlighter-rouge">CLAUDE_CODE_EXPERIMENTAL_AGENT_TEAMS=1</code> 한 줄 켜면 활성화되는 실험적 기능이다. lead 세션 하나가 PM/Architect/Dev/QA 같은 teammate들을 spawn해서 분업시킨다. 각 teammate는 독립된 Claude Code 세션이고 자기 컨텍스트 윈도우를 따로 가진다. 하네스 엔지니어링 관점에서 보면, 각 teammate 파일(<code class="language-plaintext highlighter-rouge">~/.claude/agents/*.md</code>)이 하네스 정의고, <code class="language-plaintext highlighter-rouge">TeamCreate</code>가 그 하네스를 여러 개 동시에 실행하는 방식이다.</p>

<p>업무용 노트북에선 보안 정책상 WSL2를 못 쓴다. 대안으로 <a href="https://github.com/psmux/psmux">psmux</a>를 쓴다. Rust로 짠 Windows 네이티브 tmux로, ConPTY를 직접 다루고 <code class="language-plaintext highlighter-rouge">.tmux.conf</code>를 그대로 읽는다. Claude Code agent teams를 공식 지원해서 psmux 세션 안에서 lead를 띄우면 teammate가 알아서 별도 pane에 spawn된다. 결과적으로 macOS·WSL2·psmux 세 환경에서 운영 경험 차이가 거의 없다.</p>

<hr />

<h2 id="회사-팀-인력-모델과-왜-닮았나--하네스-설계-관점">회사 팀 인력 모델과 왜 닮았나 — 하네스 설계 관점</h2>

<p>회사에서 여러 사이트를 동시에 운영하면서 PM·아키텍트·BE/FE 개발자·DBA·인프라·QA·보안 같은 역할을 나눠 굴리는데, agent teams 구조가 그 인력 모델이랑 묘하게 비슷하다. 우연이 아니다. <strong>역할 정의와 책임 격리</strong> — 이게 인간 팀 설계에서 차용한 하네스 설계 원칙이다.</p>

<p>그래서 검증해봤다. <strong>Anthropic이 공식 문서에서 “회사 조직처럼 만들었다”고 직접 명시한 적은 없다.</strong> 그 표현은 안 나온다. 하지만 채택한 메커니즘 자체가 인간 팀에서 차용한 것들이다.</p>

<ul>
  <li><strong>Lateral peer communication</strong>: teammate끼리 직접 메시지 (lead 거치지 않음)</li>
  <li><strong>Role specialization</strong>: subagent definition으로 역할별 특화</li>
  <li><strong>Shared workspace</strong>: 파일 시스템 + shared task list</li>
  <li><strong>Task claiming with file locking</strong>: sprint 티켓 잡듯 race condition 방지</li>
  <li><strong>Orchestrator-led coordination</strong>: lead가 작업 분배, teammate는 자가 클레임</li>
</ul>

<p>Anthropic이 자체적으로 진행한 실험도 같은 방향이다. 16개 에이전트로 Rust 기반 C 컴파일러를 처음부터 작성해서 Linux 6.9 커널까지 컴파일하는 데 성공했다. 단일 에이전트 워크플로로는 안 되는 규모다.</p>

<p>내가 회사 팀 굴리는 방식과 비슷한 모양으로 동작하는 게 단순 우연은 아니다.</p>

<p><a href="/assets/images/agent-teams/team-working.png" target="_blank"><img src="/assets/images/agent-teams/team-working.png" alt="Claude Code Agent Teams - SpaceCat 게임 프로젝트 5인 팀이 동시에 킥오프 분석 중인 tmux split pane" style="width: 100%; max-width: 100%; display: block;" /></a></p>

<p style="text-align: center; font-size: 0.8rem; color: #888; margin-top: -0.8rem;"><em>
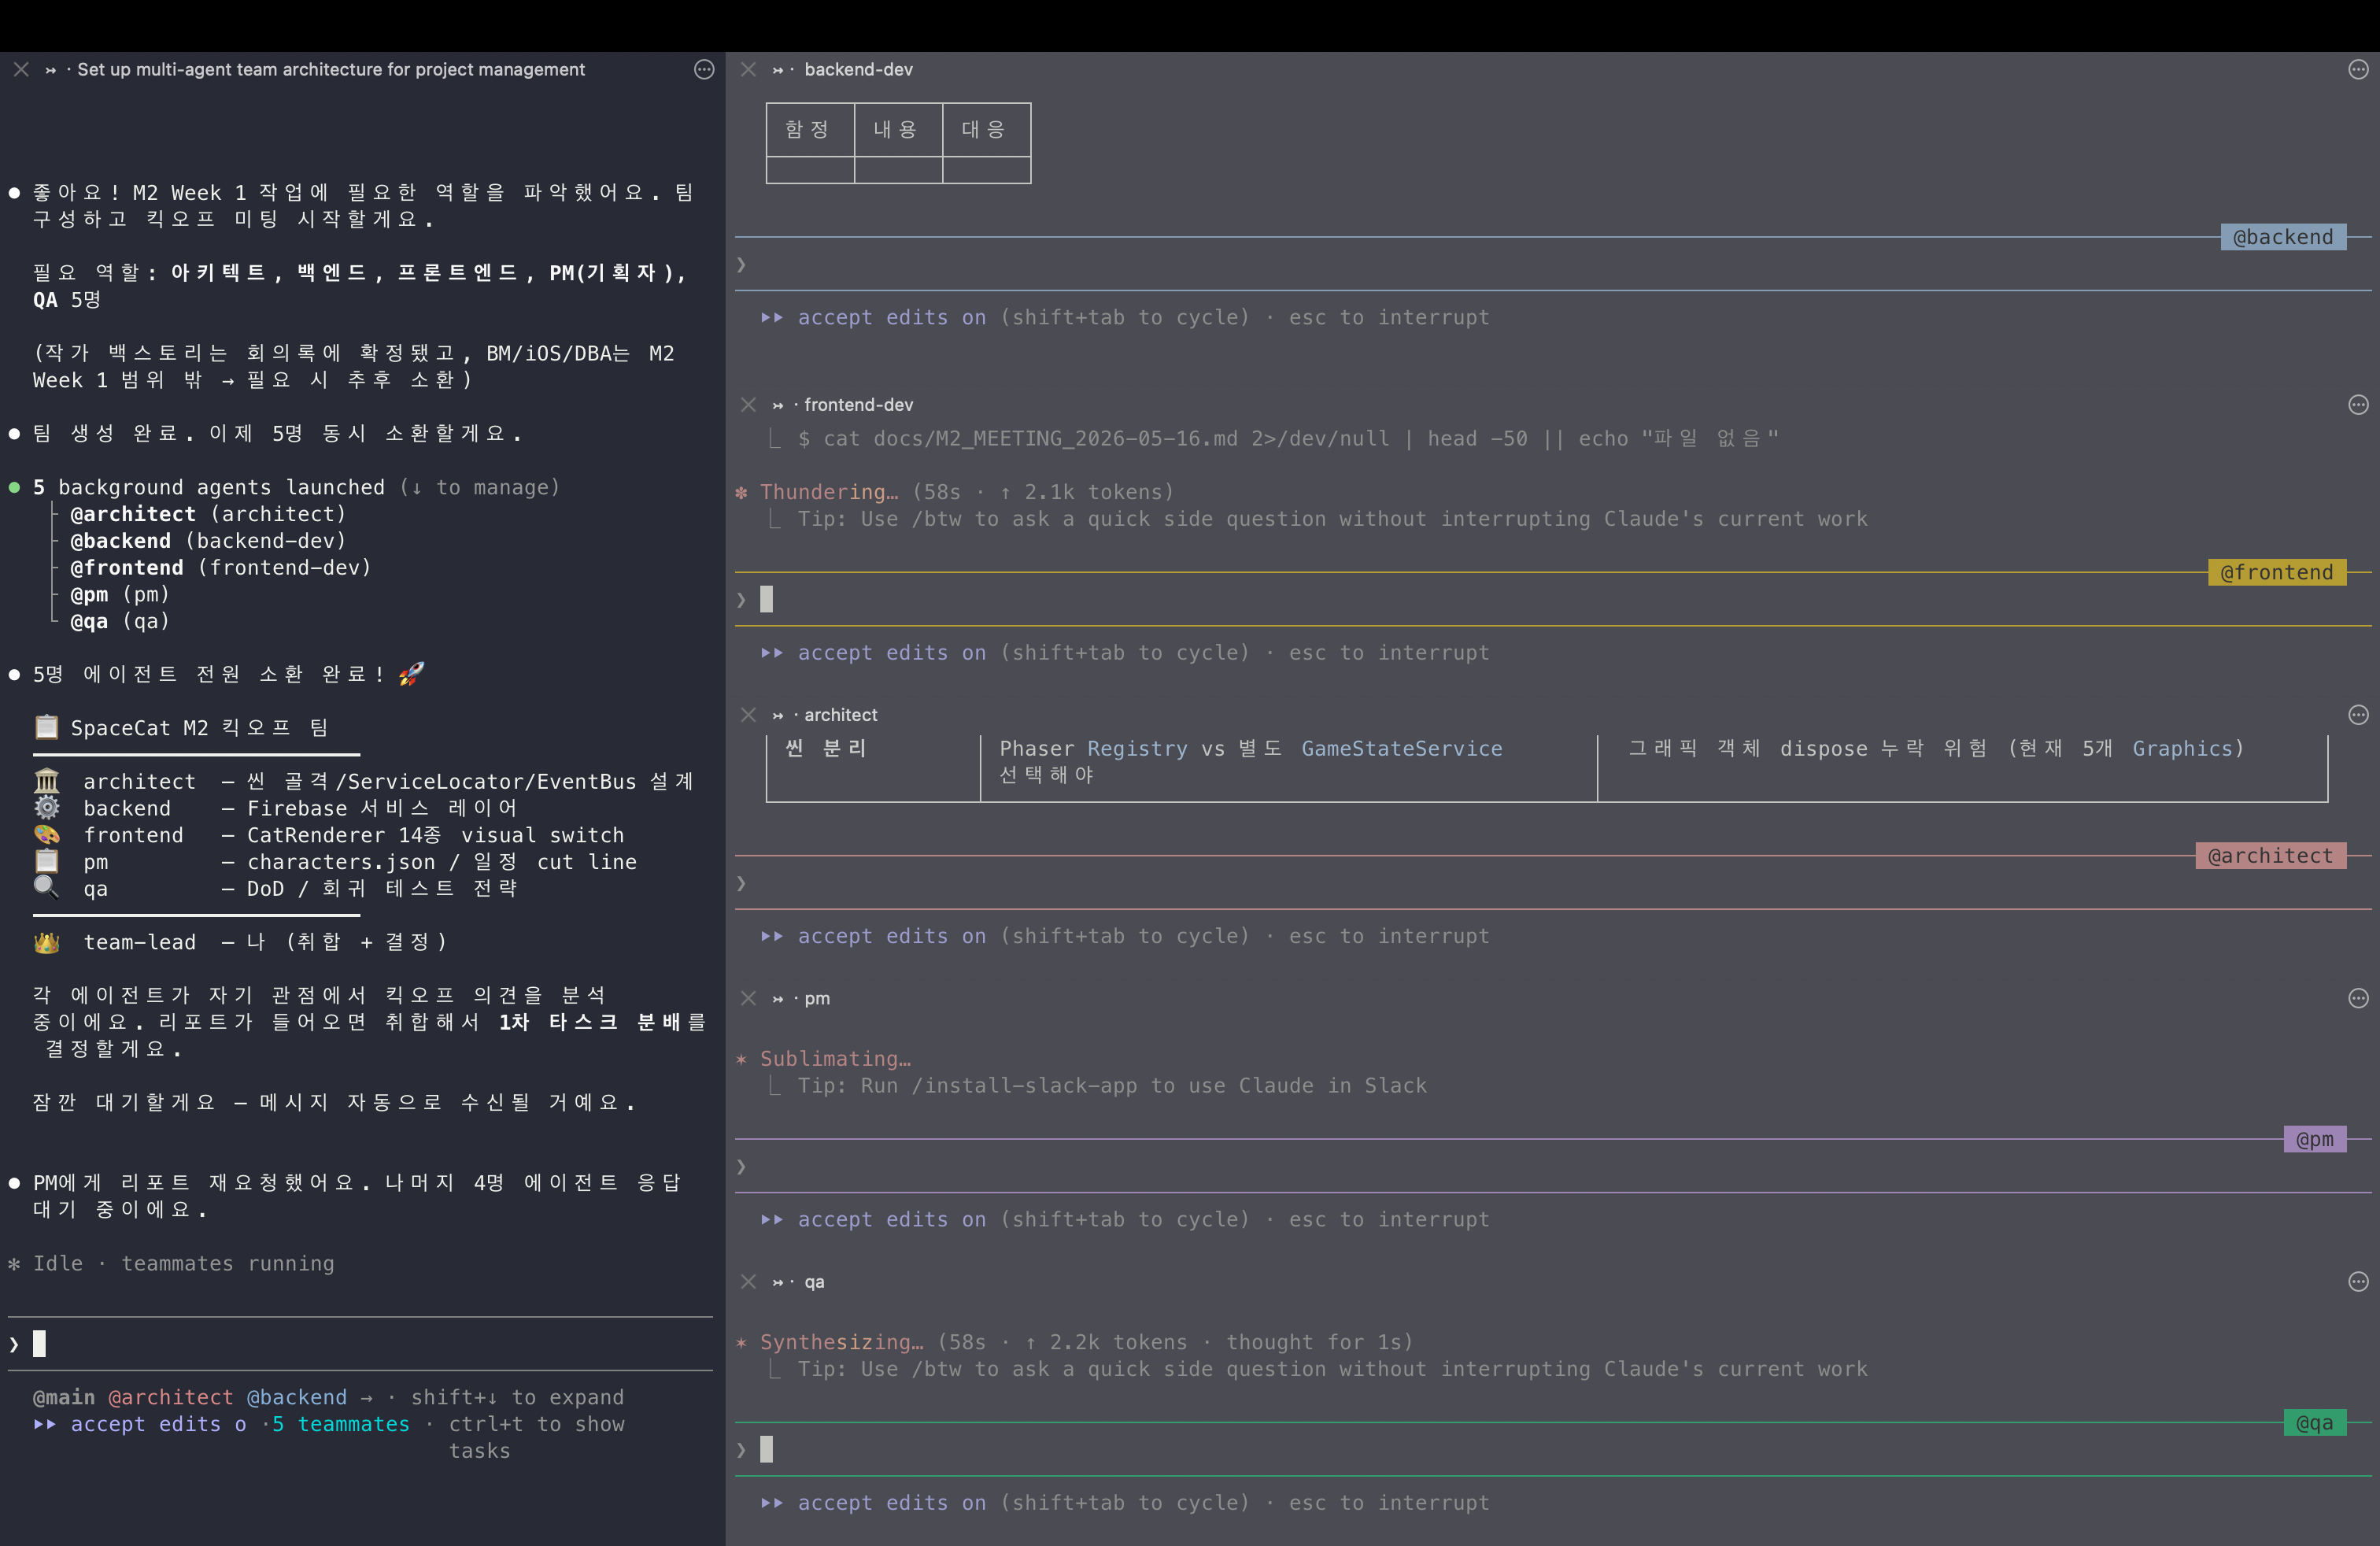
왼쪽 메인 세션이 lead. 오른쪽 5개 pane이 architect / backend / frontend / pm / qa. 개인 게임 프로젝트(SpaceCat) M2 Week 1 킥오프 — 각자 자기 도메인 의견을 동시에 분석하는 중이다.</em></p>

<hr />

<h2 id="일반-subagent-호출이랑-뭐가-다른가">일반 subagent 호출이랑 뭐가 다른가</h2>

<table>
  <thead>
    <tr>
      <th>항목</th>
      <th>일반 Subagent (<code class="language-plaintext highlighter-rouge">Agent</code> 도구)</th>
      <th>Agent Teams (<code class="language-plaintext highlighter-rouge">TeamCreate</code>)</th>
    </tr>
  </thead>
  <tbody>
    <tr>
      <td>인스턴스</td>
      <td>같은 세션에서 잠깐 띄웠다 닫힘</td>
      <td>별도 Claude Code 세션, 살아있음</td>
    </tr>
    <tr>
      <td>통신</td>
      <td>결과를 lead에 요약 반환</td>
      <td>teammate끼리 직접 메시지 가능</td>
    </tr>
    <tr>
      <td>화면</td>
      <td>lead 터미널 한 곳에서 모두 처리</td>
      <td>tmux/iTerm2 split pane으로 각자 분리</td>
    </tr>
    <tr>
      <td>작업 분배</td>
      <td>lead가 매번 호출</td>
      <td>shared task list + 자가 클레임</td>
    </tr>
    <tr>
      <td>회의록</td>
      <td>없음</td>
      <td><code class="language-plaintext highlighter-rouge">TaskCompleted</code>/<code class="language-plaintext highlighter-rouge">TeammateIdle</code> 훅으로 자동 누적</td>
    </tr>
    <tr>
      <td>토큰 비용</td>
      <td>낮음 (결과만 lead에 통합)</td>
      <td>높음 (각자 컨텍스트 윈도우)</td>
    </tr>
  </tbody>
</table>

<p>가장 큰 차이는 <strong>컨텍스트가 따로 흐른다</strong>는 거다. 5명이 동시에 작업해도 lead의 메인 컨텍스트는 깔끔하게 유지된다.</p>

<hr />

<h2 id="직접-굴려본-장점">직접 굴려본 장점</h2>

<p>개인 게임 프로젝트(SpaceCat — Phaser 기반 HTML5 게임)의 M2 Week 1 킥오프를 5인 팀으로 굴려봤다. Architect는 씬 골격·ServiceLocator·EventBus 설계, Backend는 Firebase 서비스 레이어, Frontend는 CatRenderer 14종 visual switch, PM은 characters.json·일정 cut line, QA는 DoD·회귀 테스트 전략. Lead가 5명을 동시 spawn하고 각자 자기 도메인 관점에서 의견을 분석하게 했다.</p>

<p>장점은 네 가지였다.</p>

<p><strong>컨텍스트 격리.</strong> PM은 스코프와 일정만, Architect는 설계 패턴만, BE는 데이터/서비스 레이어만, FE는 렌더링·전환 로직만 본다. 각자 자기 도메인 외 잡음이 없다.</p>

<p><strong>파일 소유권 분리.</strong> Architect가 첫 단계에서 파일 소유권 매트릭스를 박는다. 씬 골격은 Architect, Firebase 어댑터는 BE, CatRenderer는 FE 식으로 명확히 갈리니까 동시 작업해도 충돌이 안 났다.</p>

<p><strong>한 화면 모니터링.</strong> tmux split으로 5개 pane이 동시에 깜박이는 게 보인다. 어디가 막혔는지, 누가 끝났는지 즉시 파악 가능하다. Architect가 “Phaser Registry vs 별도 GameStateService” 같은 결정 분기를 띄우면 lead가 바로 받아서 판단한다.</p>

<p><strong>메인 컨텍스트 클린.</strong> lead는 “Architect 분석 완료”, “BE 서비스 레이어 초안”, “FE 렌더러 14종 매핑”, “PM 일정 cut line”, “QA DoD 초안” 정도만 본다. 각 teammate의 토큰짜리 작업 로그가 lead 컨텍스트로 흘러들지 않는다.</p>

<p>회사 업무 코드베이스에서도 같은 패턴으로 굴려봤다. 솔직히 아직 매끄럽지 않다. Task 완료 마킹이 가끔 누락되고, lead가 teammate 진행을 못 따라잡아서 다시 물어봐야 할 때가 있다. 최적화도 덜 됐다 — 같은 작업을 일반 subagent로 했을 때보다 토큰을 좀 더 쓴다. 그래도 컨텍스트 격리와 책임 분리에서 오는 이점이 단점을 충분히 누른다. 실험 단계라는 점만 감안하면 회사 실무에 붙여도 굴러간다.</p>

<hr />

<h2 id="함정과-단점">함정과 단점</h2>

<p>장점만 적으면 광고다. 실제로 겪은 단점도 똑같이 적는다.</p>

<table>
  <thead>
    <tr>
      <th>단점</th>
      <th>영향</th>
    </tr>
  </thead>
  <tbody>
    <tr>
      <td>토큰 비용 증가</td>
      <td>5명 동시 = 5개 컨텍스트. 단, 잘 쓰면 최소화 가능 (아래 절약 패턴 참고)</td>
    </tr>
    <tr>
      <td>Lead가 <code class="language-plaintext highlighter-rouge">TeamCreate</code>를 안 부른다</td>
      <td>자연어 “팀 구성해라”로는 부족. 도구 이름 명시해야 확실히 호출됨</td>
    </tr>
    <tr>
      <td><code class="language-plaintext highlighter-rouge">/resume</code> 미지원</td>
      <td>세션 재개하면 teammate 사라짐. 다시 spawn해야 함</td>
    </tr>
    <tr>
      <td>Task 완료 마킹 누락</td>
      <td>teammate가 일은 끝냈는데 task 상태가 안 바뀌어서 다음 작업이 블록되는 경우</td>
    </tr>
    <tr>
      <td>모델 의존성 큼</td>
      <td>Sonnet 4.6과 Opus 4.7이 도구 선택 패턴이 다름</td>
    </tr>
    <tr>
      <td>한 번에 한 팀만</td>
      <td>두 팀 병렬 운용 불가. nested team도 불가</td>
    </tr>
    <tr>
      <td>최적화 덜 됨 (experimental)</td>
      <td>같은 작업을 일반 subagent로 했을 때보다 토큰 소모 더 큼</td>
    </tr>
  </tbody>
</table>

<p>특히 두 번째 함정 — 자연어로 “팀 만들어”라고 하면 lead가 의도는 받아들이지만 실제로 <code class="language-plaintext highlighter-rouge">TeamCreate</code> 도구를 안 부르고 그냥 일반 subagent 4번 순차 호출로 처리하는 경우가 있다. 도구 이름을 명시적으로 박아야 한다.</p>

<hr />

<h2 id="토큰을-적게-쓰면서-굴리는-패턴">토큰을 적게 쓰면서 굴리는 패턴</h2>

<p>5배 컨텍스트는 무조건 정해진 값이 아니다. 다음만 지키면 단일 세션 대비 1.5~2배 수준으로 끝낼 수 있다. 결과 품질 향상까지 고려하면 비용 손해는 아니다.</p>

<ul>
  <li><strong>작업에 필요한 인원만 띄운다.</strong> 풀세트 13명을 매번 부르면 의미 없다. 작업 성격에 맞춰 3~5명으로 끊는다.</li>
  <li><strong>Teammate 모델을 작업 난이도에 맞춘다.</strong> Architect만 Opus, 나머지는 Sonnet 또는 Haiku. <code class="language-plaintext highlighter-rouge">/config</code>의 default teammate model 설정 또는 spawn 프롬프트에서 직접 지정한다.</li>
  <li><strong>Read-only 에이전트는 도구를 제한한다.</strong> PM/Architect는 <code class="language-plaintext highlighter-rouge">Write</code>/<code class="language-plaintext highlighter-rouge">Edit</code> 없이 <code class="language-plaintext highlighter-rouge">Read</code>/<code class="language-plaintext highlighter-rouge">Grep</code>만 줘도 충분하다. 불필요한 도구 호출이 줄어든다.</li>
  <li><strong>Architect 단계에서 파일 소유권을 분명히 나눈다.</strong> 재작업이 없으면 컨텍스트도 부풀지 않는다.</li>
  <li><strong>작업 크기를 작게 자른다.</strong> 한 teammate가 5~6개 task로 끝나는 정도면 컨텍스트 윈도우가 안 터진다.</li>
  <li><strong>단순 작업엔 일반 subagent로 끊는다.</strong> 팀 모드는 진짜 분업 가치가 있을 때만.</li>
</ul>

<p>요약하면 <strong>사람 적게, 모델 가볍게, 도구 좁게, 작업 잘게</strong>. 이 네 가지가 토큰 청구서를 결정한다.</p>

<hr />

<h2 id="잘-써보인다는-메타-효과--인정한다">“잘 써보인다”는 메타 효과 — 인정한다</h2>

<p>5개 pane에서 PM/Architect/Dev/QA가 각자 다른 작업으로 깜박이고 있는 화면은 솔직히 멋있어 보인다. 카페에서 옆자리 사람이 흘끔거리는 정도의 비주얼이다.</p>

<p>근데 그게 다였으면 안 쓴다. 실제로 결과 품질이 올라가니까 쓰는 거다. 책임 영역이 분리되고 컨텍스트가 격리되니까 한 명한테 다 시키는 것보다 누락이 적다. Architect가 만든 파일 소유권 매트릭스는 한 사람짜리 세션에서는 잘 안 만들어지는 산출물이다.</p>

<p>시각 효과 자체가 목표는 아니다. 결과 품질을 위해 분업하다 보니 부수적으로 화면이 보기 좋아진 거다.</p>

<hr />

<h2 id="5명은-워밍업-진짜는-13인-조직도">5명은 워밍업, 진짜는 13인 조직도</h2>

<p>블로그 같은 작은 프로젝트는 5명 MVP 팀(PM/Architect/BE/FE/QA)으로 충분하다. 하지만 회사 실무 코드베이스는 도메인이 더 잘게 쪼개진다. 영역별 특화 에이전트를 추가하면 각자가 자기 도메인 전문 지식으로 답한다.</p>

<p>내가 회사 실무에서 쓰는 풀세트 조직도다.</p>

<table>
  <thead>
    <tr>
      <th>역할</th>
      <th>책임 영역</th>
      <th>언제 투입</th>
    </tr>
  </thead>
  <tbody>
    <tr>
      <td><strong>PM</strong></td>
      <td>요구사항 명확화, 스펙 작성, 우선순위</td>
      <td>모든 작업 시작점</td>
    </tr>
    <tr>
      <td><strong>PL</strong></td>
      <td>일정/진척 관리, 의존성 트래킹</td>
      <td>다중 워크스트림일 때</td>
    </tr>
    <tr>
      <td><strong>Architect</strong></td>
      <td>시스템 설계, 모듈 경계, 파일 소유권</td>
      <td>신규 모듈/큰 변경 시</td>
    </tr>
    <tr>
      <td><strong>기획자</strong></td>
      <td>사용자 시나리오, 플로우 차트</td>
      <td>신규 기능 정의 단계</td>
    </tr>
    <tr>
      <td><strong>Designer</strong></td>
      <td>UI/UX 결정, 디자인 시스템 일관성</td>
      <td>시각적 산출물 작업</td>
    </tr>
    <tr>
      <td><strong>퍼블리셔</strong></td>
      <td>디자인 → 마크업/CSS 코드화</td>
      <td>디자이너 산출물 받은 직후</td>
    </tr>
    <tr>
      <td><strong>BE Dev</strong></td>
      <td>서버 로직, API 구현, 도메인 모델</td>
      <td>백엔드 작업</td>
    </tr>
    <tr>
      <td><strong>FE Dev</strong></td>
      <td>클라이언트 로직, 상태 관리, 인터랙션</td>
      <td>프론트엔드 작업</td>
    </tr>
    <tr>
      <td><strong>DBA</strong></td>
      <td>스키마 설계, 쿼리 튜닝, 인덱스 전략</td>
      <td>DB 변경 시</td>
    </tr>
    <tr>
      <td><strong>인프라</strong></td>
      <td>배포 파이프라인, CI/CD, 모니터링</td>
      <td>환경/배포 작업</td>
    </tr>
    <tr>
      <td><strong>보안</strong></td>
      <td>취약점 점검, 키 관리, 감사 로그</td>
      <td>인증/결제/민감 로직 작업</td>
    </tr>
    <tr>
      <td><strong>QA</strong></td>
      <td>테스트 시나리오, 빌드/시각 회귀, 사인오프</td>
      <td>모든 구현 완료 후</td>
    </tr>
    <tr>
      <td><strong>VoC</strong></td>
      <td>사용자 피드백 수집·정리, 이슈 우선순위 제안</td>
      <td>사용자 제보 처리 단계</td>
    </tr>
    <tr>
      <td><strong>(게임 시) 작가</strong></td>
      <td>시나리오, 내러티브, 카피라이팅</td>
      <td>게임 콘텐츠 작업</td>
    </tr>
  </tbody>
</table>

<p>각 에이전트는 <code class="language-plaintext highlighter-rouge">~/.claude/agents/{role}.md</code> 하나로 정의된다. YAML frontmatter에 <code class="language-plaintext highlighter-rouge">name</code>, <code class="language-plaintext highlighter-rouge">description</code>, <code class="language-plaintext highlighter-rouge">tools</code>, <code class="language-plaintext highlighter-rouge">model</code> 박고 시스템 프롬프트에 책임/금지사항 적으면 끝이다. 한번 만들면 모든 프로젝트에서 재사용된다. 이 파일 하나가 하네스 정의 단위다. 모델이 뭘 알고 뭘 모르는지, 어디까지 건드릴 수 있는지가 이 파일로 결정된다.</p>

<p>특화의 의미는 <strong>그 도메인 외 잡음이 안 들어온다</strong>는 거다. 보안 에이전트는 OWASP 체크리스트 기준으로만 본다. DBA 에이전트는 N+1, 인덱스 누락, 트랜잭션 격리 수준만 본다. 풀스택 단일 에이전트는 이 모든 걸 동시에 봐야 해서 정작 중요한 사각지대를 놓친다.</p>

<hr />

<h2 id="어떤-작업에-어떤-구성">어떤 작업에 어떤 구성?</h2>

<p>작업 성격에 따라 lead한테 구성을 지시한다. 사람 늘리는 게 능사는 아니다.</p>

<table>
  <thead>
    <tr>
      <th>작업 유형</th>
      <th>구성</th>
      <th>이유</th>
    </tr>
  </thead>
  <tbody>
    <tr>
      <td>블로그 글/페이지 추가</td>
      <td>일반 subagent</td>
      <td>팀 띄울 정도가 아님</td>
    </tr>
    <tr>
      <td>단순 기능 추가 (필터/검색 등)</td>
      <td>5명 MVP</td>
      <td>풀스택이지만 범위 명확</td>
    </tr>
    <tr>
      <td>신규 풀스택 모듈</td>
      <td>8명 (+Designer/퍼블리셔/DBA)</td>
      <td>디자인부터 DB까지 전 레이어</td>
    </tr>
    <tr>
      <td>보안 감사 / 취약점 점검</td>
      <td>3명 (보안+Architect+QA)</td>
      <td>코드 변경 없이 조사만</td>
    </tr>
    <tr>
      <td>결제/인증 로직</td>
      <td>6명 (5명+보안)</td>
      <td>보안 게이트 필수</td>
    </tr>
    <tr>
      <td>인프라/배포 작업</td>
      <td>3명 (인프라+Architect+QA)</td>
      <td>코드 영향보다 환경 영향 검증 중심</td>
    </tr>
    <tr>
      <td>게임 신규 콘텐츠</td>
      <td>4명 (작가+기획+Designer+Dev)</td>
      <td>스토리부터 구현까지</td>
    </tr>
  </tbody>
</table>

<p>작업 시작 전에 “이번 작업에 누구 누구 붙여” 라고 lead한테 명시한다. 그러지 않으면 lead가 임의로 풀세트를 띄울 수 있다.</p>

<hr />

<h2 id="단순-작업엔-쓰지-마라">단순 작업엔 쓰지 마라</h2>

<p>오해 방지. 모든 작업을 팀으로 굴리면 안 된다.</p>

<ul>
  <li><strong>타이포 수정</strong> — 일반 Claude Code 한 명으로 충분</li>
  <li><strong>라이브러리 1줄 업그레이드</strong> — 팀 띄우는 오버헤드가 작업 자체보다 큼</li>
  <li><strong>테스트 1개 추가</strong> — subagent 한 명 호출이 빠름</li>
  <li><strong>README 업데이트</strong> — 팀 모드 자체가 낭비</li>
</ul>

<p>기준은 단순하다. <strong>풀스택 분업이 자연스럽게 떠오르는 작업</strong>일 때만 팀을 띄운다. 한 사람이 머릿속에서 다 처리할 수 있는 크기면 단일 세션이 정답이다.</p>

<p>토큰 5배는 진짜 5배다. 가볍게 보면 안 된다.</p>

<hr />

<h2 id="마무리">마무리</h2>

<p>하네스 엔지니어링은 모델을 고르는 게 아니라 모델이 작동하는 환경을 설계하는 일이다. Agent Teams는 그 환경을 여러 역할로 분산시키는 방식이다.</p>

<p>협력업체 메타포는 여전히 잘 맞는다. 대표한테만 발주하고 나머지는 알아서 분업한다. 다만 외주사 고를 때처럼 작업 크기와 구성을 가려서 발주해야 한다. 풀세트 팀을 매번 띄우는 게 능사가 아니라는 점, 에이전트 파일(역할 정의)을 잘 짜는 것 자체가 하네스 엔지니어링이라는 점, 이 둘만 기억하면 단일 세션으로 만드는 결과보다 누락이 적다.</p>

<hr />

<h2 id="출처">출처</h2>

<ul>
  <li><a href="https://code.claude.com/docs/en/agent-teams">Claude Code Agent Teams 공식 문서</a></li>
  <li><a href="https://code.claude.com/docs/en/sub-agents">Claude Code Subagents</a></li>
  <li><a href="https://code.claude.com/docs/en/agents">Run agents in parallel — 비교 가이드</a></li>
  <li><a href="https://claude.com/blog/how-anthropic-teams-use-claude-code">How Anthropic teams use Claude Code</a></li>
  <li><a href="https://www.anthropic.com/engineering/building-c-compiler">Building a C compiler with a team of parallel Claudes — Anthropic Engineering</a></li>
  <li><a href="https://mitchellh.com/writing/harness-engineering">Mitchell Hashimoto — Harness Engineering (원 개념 정의)</a></li>
  <li><a href="https://github.com/psmux/psmux">psmux — Windows native tmux (GitHub)</a></li>
</ul>]]></content><author><name>nninnis</name></author><category term="claude-code" /><summary type="html"><![CDATA[요즘 AI 판에서 ‘하네스 엔지니어링’이라는 말이 돌고 있다. 인터넷 어딘가에서 한 번씩은 스쳐가는 그 단어. 알고 쓰면 무기, 모르고 쓰면 장식이다. 정확히 뭔지, Claude Code Agent Teams로 직접 써보면서 정리했다.]]></summary></entry><entry><title type="html">Claude Code + Codex 플러그인 실무 워크플로우 — 두 에이전트를 한 터미널에서</title><link href="https://nninnis.github.io/claude-code/2026/05/07/claude-code-codex-plugin-workflow/" rel="alternate" type="text/html" title="Claude Code + Codex 플러그인 실무 워크플로우 — 두 에이전트를 한 터미널에서" /><published>2026-05-07T00:00:00+09:00</published><updated>2026-05-07T00:00:00+09:00</updated><id>https://nninnis.github.io/claude-code/2026/05/07/claude-code-codex-plugin-workflow</id><content type="html" xml:base="https://nninnis.github.io/claude-code/2026/05/07/claude-code-codex-plugin-workflow/"><![CDATA[<p>3월 말에 <code class="language-plaintext highlighter-rouge">openai/codex-plugin-cc</code>가 공식 릴리스되고 나서 실무 세션에 붙여서 써왔다. 이제 슬 정리할 때가 됐다 싶어서 쓴다.</p>

<hr />

<h2 id="이게-뭔지-한-줄-요약">이게 뭔지 한 줄 요약</h2>

<p>Claude Code 세션 안에서 슬래시 커맨드로 Codex를 호출하는 플러그인이다. 리뷰, 디버깅 위임, 배경 작업 등을 Codex에 던지고 Claude는 오케스트레이션에 집중한다.</p>

<hr />

<h2 id="설치">설치</h2>

<div class="language-bash highlighter-rouge"><div class="highlight"><pre class="highlight"><code><span class="c"># Claude Code 세션 내에서</span>
/plugin marketplace add openai/codex-plugin-cc
/plugin <span class="nb">install </span>codex@openai-codex
/reload-plugins
/codex:setup
</code></pre></div></div>

<p>OpenAI 계정(ChatGPT Free 포함)이나 API 키가 있으면 된다. Codex CLI가 없으면 <code class="language-plaintext highlighter-rouge">/codex:setup</code> 단계에서 자동으로 설치 여부를 물어본다.</p>

<hr />

<h2 id="명령어-정리">명령어 정리</h2>

<h3 id="codexreview"><code class="language-plaintext highlighter-rouge">/codex:review</code></h3>

<p>현재 변경사항에 대한 표준 코드 리뷰. 커밋되지 않은 diff, 브랜치 diff, 특정 파일 범위를 대상으로 쓸 수 있다. 읽기 전용이라 코드에 손대지 않는다.</p>

<p>시간이 좀 걸리는 리뷰라면 백그라운드로 돌리는 게 낫다:</p>

<div class="language-bash highlighter-rouge"><div class="highlight"><pre class="highlight"><code>/codex:review <span class="nt">--background</span>
</code></pre></div></div>

<h3 id="codexadversarial-review"><code class="language-plaintext highlighter-rouge">/codex:adversarial-review</code></h3>

<p>일반 리뷰가 아니다. “뭔가 문제가 있다고 가정하고 찾아내라”는 방식의 악마의 변호인 분석이다. 설계 결정에 의문을 던지고, 실패 케이스를 파고들고, 더 단순하거나 안전한 접근이 있었는지를 따진다.</p>

<p>기능 완성 직후 Self-QA 용도로 쓰기 좋다. 읽기 전용.</p>

<h3 id="codexrescue"><code class="language-plaintext highlighter-rouge">/codex:rescue</code></h3>

<p>커맨드 중 <strong>유일하게 코드 변경이 가능한</strong> 명령이다. 특정 태스크를 Codex에 위임하고 실제 작업을 시킨다.</p>

<div class="language-bash highlighter-rouge"><div class="highlight"><pre class="highlight"><code>/codex:rescue investigate why the tests started failing
/codex:rescue fix the failing <span class="nb">test </span>with the smallest safe patch
/codex:rescue <span class="nt">--model</span> gpt-5.4-mini <span class="nt">--effort</span> medium investigate the flaky integration <span class="nb">test</span>
/codex:rescue <span class="nt">--background</span> investigate the regression
/codex:resume  <span class="c"># 직전 rescue 스레드 이어받기</span>
/codex:rescue <span class="nt">--fresh</span>  <span class="c"># 새 스레드로 시작</span>
</code></pre></div></div>

<p><code class="language-plaintext highlighter-rouge">--model</code> 옵션으로 빠른 작업에는 경량 모델을 쓸 수 있다. 단순 반복 수정, 테스트 수정, 린트 수정 같은 작업을 싸게 돌리는 용도다.</p>

<h3 id="codexstatus--codexcancel"><code class="language-plaintext highlighter-rouge">/codex:status</code> / <code class="language-plaintext highlighter-rouge">/codex:cancel</code></h3>

<p>백그라운드로 돌린 rescue나 review 작업 상태 확인 및 취소.</p>

<div class="language-bash highlighter-rouge"><div class="highlight"><pre class="highlight"><code>/codex:status   <span class="c"># 진행 중인 작업 확인</span>
/codex:cancel   <span class="c"># 취소</span>
</code></pre></div></div>

<h3 id="codexresult"><code class="language-plaintext highlighter-rouge">/codex:result</code></h3>

<p>완료된 작업의 결과 확인. Codex 세션 ID도 함께 반환해서, 터미널에서 직접 <code class="language-plaintext highlighter-rouge">codex resume &lt;session-id&gt;</code>로 그 세션에 접속할 수도 있다.</p>

<h3 id="codexsetup"><code class="language-plaintext highlighter-rouge">/codex:setup</code></h3>

<p>설치 상태 확인, 리뷰 게이트 활성화/비활성화.</p>

<div class="language-bash highlighter-rouge"><div class="highlight"><pre class="highlight"><code>/codex:setup <span class="nt">--enable-review-gate</span>
/codex:setup <span class="nt">--disable-review-gate</span>
</code></pre></div></div>

<hr />

<h2 id="백그라운드-워크플로우">백그라운드 워크플로우</h2>

<p>실무에서 가장 유용하게 쓰는 패턴이다.</p>

<ol>
  <li>Claude가 기능 구현 중</li>
  <li>구현 완료 후 <code class="language-plaintext highlighter-rouge">--background</code>로 review나 rescue 실행</li>
  <li>Claude는 다음 태스크로 넘어감</li>
  <li>잠시 후 <code class="language-plaintext highlighter-rouge">/codex:status</code> → <code class="language-plaintext highlighter-rouge">/codex:result</code>로 결과 수령</li>
</ol>

<p>무거운 리뷰를 기다리면서 멈추지 않아도 된다. 컨텍스트 낭비가 없다.</p>

<hr />

<h2 id="review-gate">Review Gate</h2>

<div class="language-bash highlighter-rouge"><div class="highlight"><pre class="highlight"><code>/codex:setup <span class="nt">--enable-review-gate</span>
</code></pre></div></div>

<p>활성화하면 Claude가 응답을 끝낼 때마다 Stop Hook이 트리거되어 Codex가 해당 응답을 자동으로 리뷰한다. 문제가 발견되면 Claude가 멈추기 전에 다시 돌아가서 수정한다.</p>

<p><strong>주의</strong>: Claude↔Codex 루프가 길게 이어질 수 있어서 사용량이 빠르게 소진된다. 세션을 모니터링할 수 있을 때만 켜는 게 맞다.</p>

<hr />

<h2 id="실무-워크플로우-예시">실무 워크플로우 예시</h2>

<h3 id="일반적인-기능-개발">일반적인 기능 개발</h3>

<div class="language-plaintext highlighter-rouge"><div class="highlight"><pre class="highlight"><code>[Claude] 요구사항 분석 → 구현 계획 수립 → 코드 작성
[실행] /codex:review --background
[Claude] 다음 태스크로 진행
[나중에] /codex:result → 리뷰 결과 반영
</code></pre></div></div>

<h3 id="테스트-실패-디버깅">테스트 실패 디버깅</h3>

<div class="language-plaintext highlighter-rouge"><div class="highlight"><pre class="highlight"><code>[CI에서 테스트 실패 확인]
/codex:rescue investigate why the tests started failing
/codex:status (기다리는 동안 다른 작업)
/codex:result → 원인 분석 결과 확인
/codex:rescue --resume apply the top fix from the last run
</code></pre></div></div>

<h3 id="pr-직전-최종-검증">PR 직전 최종 검증</h3>

<div class="language-plaintext highlighter-rouge"><div class="highlight"><pre class="highlight"><code>/codex:adversarial-review
→ 결과 보고 위험 지점 수정
/codex:review
→ 최종 확인 후 PR
</code></pre></div></div>

<hr />

<h2 id="claude-code-단독-vs-codex-연동--팩트-기반-비교">Claude Code 단독 vs Codex 연동 — 팩트 기반 비교</h2>

<table>
  <thead>
    <tr>
      <th>항목</th>
      <th>Claude Code 단독</th>
      <th>Codex 연동</th>
    </tr>
  </thead>
  <tbody>
    <tr>
      <td>장문 컨텍스트 이해</td>
      <td>강함</td>
      <td>약함</td>
    </tr>
    <tr>
      <td>코드 리뷰 편향 제거</td>
      <td>본인 결과물 리뷰라 사각지대 있음</td>
      <td>독립된 에이전트라 객관성 있음</td>
    </tr>
    <tr>
      <td>모델 비용</td>
      <td>Opus/Sonnet 기준</td>
      <td>경량 모델 선택 가능 (<code class="language-plaintext highlighter-rouge">gpt-5.4-mini</code>)</td>
    </tr>
    <tr>
      <td>코드 직접 수정</td>
      <td>항상 가능</td>
      <td>rescue만 가능</td>
    </tr>
    <tr>
      <td>백그라운드 실행</td>
      <td>없음</td>
      <td>있음</td>
    </tr>
    <tr>
      <td>설정 복잡도</td>
      <td>없음</td>
      <td>OpenAI 계정 필요</td>
    </tr>
    <tr>
      <td>워크플로우 단절</td>
      <td>없음</td>
      <td>두 모델 결과 병합 필요</td>
    </tr>
  </tbody>
</table>

<p>정리하면: <strong>Claude가 오케스트레이터, Codex가 전문가 호출</strong> 구조다. Codex를 붙인다고 Claude가 약해지는 게 아니라, 사각지대를 다른 모델이 채우는 방식이다.</p>

<p>리뷰 편향 제거가 핵심 이유다. 같은 모델이 짜고 리뷰하면 같은 실수를 반복해서 못 잡는다.</p>

<hr />

<h2 id="이커머스--웹-si--운영-업무-적용">이커머스 / 웹 SI · 운영 업무 적용</h2>

<h3 id="이커머스-운영">이커머스 운영</h3>

<ul>
  <li><strong>장바구니/결제 로직 변경 시</strong>: <code class="language-plaintext highlighter-rouge">/codex:adversarial-review</code>로 엣지케이스(중복 주문, 재고 경쟁, 쿠폰 조합) 집중 공략</li>
  <li><strong>프로모션 코드 긴급 배포</strong>: <code class="language-plaintext highlighter-rouge">--background</code>로 리뷰 돌리고 다른 긴급 수정 병행</li>
  <li><strong>구버전 레거시 정산 코드</strong>: <code class="language-plaintext highlighter-rouge">/codex:rescue</code> 위임으로 Claude 컨텍스트 낭비 없이 정리</li>
</ul>

<h3 id="웹-si-프로젝트">웹 SI 프로젝트</h3>

<ul>
  <li><strong>마감 전 납품 점검</strong>: PR 직전 adversarial-review로 클라이언트 피드백 전에 미리 걸러내기</li>
  <li><strong>외주 코드 인수인계</strong>: 받은 코드베이스에 review 돌려서 품질 리포트 빠르게 뽑기</li>
  <li><strong>반복 수정 요청 대응</strong>: 단순 레이아웃/스타일 수정은 <code class="language-plaintext highlighter-rouge">--model gpt-5.4-mini</code>로 비용 절감</li>
</ul>

<h3 id="공통">공통</h3>

<p>팀 작업이 아닌 1인 개발이거나 리뷰어가 없는 프로젝트에서 <strong>셀프 리뷰의 한계</strong>를 메우는 용도가 가장 실용적이다.</p>

<hr />

<h2 id="팁-모음">팁 모음</h2>

<ul>
  <li><strong>모델 기본값 설정</strong>: 프로젝트 루트에 <code class="language-plaintext highlighter-rouge">.codex/config.toml</code> 두면 매번 <code class="language-plaintext highlighter-rouge">--model</code> 안 써도 된다</li>
  <li><strong>review gate는 집중 작업 시에만</strong>: 세션 감시 안 되는 상태에서 켜면 사용량 폭탄</li>
  <li><strong>rescue는 작게 위임</strong>: 범위가 넓으면 결과 병합이 복잡해진다. 태스크 단위를 작게 잘라서 던지는 게 낫다</li>
  <li><strong>result에서 session-id 챙기기</strong>: <code class="language-plaintext highlighter-rouge">codex resume &lt;id&gt;</code>로 터미널에서 바로 이어받을 수 있어서 디버깅 심화 때 유용하다</li>
</ul>

<hr />

<p>Sources:</p>
<ul>
  <li><a href="https://github.com/openai/codex-plugin-cc">GitHub - openai/codex-plugin-cc</a></li>
  <li><a href="https://community.openai.com/t/introducing-codex-plugin-for-claude-code/1378186">Introducing Codex Plugin for Claude Code - OpenAI Developer Community</a></li>
</ul>]]></content><author><name>nninnis</name></author><category term="claude-code" /><summary type="html"><![CDATA[3월 말에 openai/codex-plugin-cc가 공식 릴리스되고 나서 실무 세션에 붙여서 써왔다. 이제 슬 정리할 때가 됐다 싶어서 쓴다.]]></summary></entry><entry><title type="html">Space Cat - 우주를 향해 점프하는 고양이 게임 프로토타입</title><link href="https://nninnis.github.io/game/2026/04/27/space-cat-prototype/" rel="alternate" type="text/html" title="Space Cat - 우주를 향해 점프하는 고양이 게임 프로토타입" /><published>2026-04-27T00:00:00+09:00</published><updated>2026-04-27T00:00:00+09:00</updated><id>https://nninnis.github.io/game/2026/04/27/space-cat-prototype</id><content type="html" xml:base="https://nninnis.github.io/game/2026/04/27/space-cat-prototype/"><![CDATA[<p>지상의 작은 고양이가 빌딩 옥상, 새, 구름을 발판 삼아 우주까지 올라가는 무한 상승 스코어 어택이다. 장르는 Doodle Jump 계열. 추락하면 게임오버, 도달 고도가 점수.</p>

<h2 id="조작법">조작법</h2>

<p><strong>PC</strong></p>
<ul>
  <li><code class="language-plaintext highlighter-rouge">← →</code> 또는 <code class="language-plaintext highlighter-rouge">A D</code> — 좌우 이동</li>
  <li><code class="language-plaintext highlighter-rouge">Space</code> / <code class="language-plaintext highlighter-rouge">↑</code> / <code class="language-plaintext highlighter-rouge">W</code> — 점프 (벽에 붙은 상태에서 자동 벽 점프)</li>
</ul>

<p><strong>모바일 (한 손 조작)</strong></p>

<table>
  <thead>
    <tr>
      <th>입력</th>
      <th>결과</th>
    </tr>
  </thead>
  <tbody>
    <tr>
      <td>터치 시작</td>
      <td>즉시 점프</td>
    </tr>
    <tr>
      <td>누르고 있기</td>
      <td>추진력 유지, 최대 250ms</td>
    </tr>
    <tr>
      <td>누른 채 좌우 드래그</td>
      <td>드래그 거리 비례 X 속도</td>
    </tr>
    <tr>
      <td>손가락 뗌</td>
      <td>추진력 종료</td>
    </tr>
  </tbody>
</table>

<p>작은 드래그에도 즉각 반응하도록 x^0.4 곡선 적용. 손 크기와 무관하게 45px 드래그면 최대 속도다.</p>

<h2 id="발판-종류">발판 종류</h2>

<ul>
  <li><strong>빌딩 옥상</strong> — 기본 발판. 측면에 붙으면 벽 점프 가능</li>
  <li><strong>새</strong> — 이동형 발판. 밟으면 슈퍼 점프 (+속도)</li>
  <li><strong>구름</strong> — 일회성 발판. 한 번 밟으면 흩어짐. 머리로는 통과</li>
  <li><strong>비행기</strong> — 장애물. 위에서 밟으면 슈퍼 점프, 측면 충돌 시 추락 (1500m+)</li>
</ul>

<h2 id="고도별-환경-변화">고도별 환경 변화</h2>

<table>
  <thead>
    <tr>
      <th>고도</th>
      <th>환경</th>
      <th>발판 구성</th>
    </tr>
  </thead>
  <tbody>
    <tr>
      <td>0 – 1,500m</td>
      <td>도시 하늘</td>
      <td>빌딩 85% / 새 15%</td>
    </tr>
    <tr>
      <td>1,500 – 4,000m</td>
      <td>구름층</td>
      <td>구름 50% / 빌딩 35% / 새 15%</td>
    </tr>
    <tr>
      <td>4,000 – 8,000m</td>
      <td>높은 하늘</td>
      <td>구름 65% / 빌딩 25% / 새 10%</td>
    </tr>
    <tr>
      <td>8,000m+</td>
      <td>우주 근처</td>
      <td>구름 55% / 새 30% / 빌딩 15%</td>
    </tr>
  </tbody>
</table>

<p>3000m를 넘으면 배경에 별이 깜박이기 시작한다.</p>

<div style="position: relative; width: 100%; max-width: 400px; margin: 1.5rem auto; padding-top: min(700px, 175%); border-radius: 12px; overflow: hidden; box-shadow: 0 4px 24px rgba(0,0,0,0.3);">
  <iframe src="/games/space-cat/" style="position: absolute; top: 0; left: 0; width: 100%; height: 100%; border: none;" allow="autoplay" loading="lazy">
  </iframe>
</div>

<p style="text-align: center; margin-top: 0.5rem;">
  <a href="/games/space-cat/" target="_blank">전체 화면으로 플레이 &rarr;</a>
</p>

<h2 id="프로토타입에서-검증한-것들">프로토타입에서 검증한 것들</h2>

<p>v0.1부터 v0.10b까지 총 11번의 이터레이션을 거쳤다. 핵심 결정 사항들:</p>

<p><strong>시점</strong>: 백뷰 의사 3D, 자동 상승 러너 등 여러 방향을 시도했지만 결국 사이드뷰 Doodle Jump 계열로 확정. 고양이가 화면을 가로지르며 올라가는 게 직관적이고 재미있었다.</p>

<p><strong>모바일 조작</strong>: 가장 오래 걸린 부분. <code class="language-plaintext highlighter-rouge">떼는 순간 점프</code>, <code class="language-plaintext highlighter-rouge">탭=점프+드래그=이동 분리</code>, <code class="language-plaintext highlighter-rouge">슬라이드 점프</code> 등을 다 거절하고 마리오식 가변 점프 + 드래그 X 속도 방식으로 확정했다. 손가락 하나로 높이와 방향을 동시에 조절할 수 있다.</p>

<p><strong>발판 배치</strong>: 초반에는 완전 랜덤 배치였는데, 위로 올라가다가 머리를 박거나 발판이 한쪽으로 몰리는 문제가 있었다. 이전 발판 위치를 추적해서 65% 확률로 반대편에 배치하는 지그재그 알고리즘을 넣었더니 자연스럽게 해결됐다.</p>

<h2 id="다음-단계">다음 단계</h2>

<p>이 프로토타입은 코어 게임필 검증용이다. v1.0에서는 Phaser 3 + TypeScript로 전환하고, 픽셀 아트 캐릭터 자산, 새 7종 차별화, 우박·번개 날씨 이벤트, BGM/SFX를 붙일 예정이다. 최종 목표는 App Store + Play Store 출시.</p>]]></content><author><name>nninnis</name></author><category term="game" /><summary type="html"><![CDATA[빌딩 옥상·새·구름을 발판 삼아 우주까지 올라가는 무한 상승 스코어 어택 프로토타입. 모바일 한 손 조작, 벽 점프, 절차적 레벨 생성 포함.]]></summary></entry><entry><title type="html">Painting Star 개발기 6 — 튜토리얼 설계, 1.1.0 업데이트, 안드로이드 준비</title><link href="https://nninnis.github.io/painting-star/2026/04/26/painting-star-6-tutorial-and-update/" rel="alternate" type="text/html" title="Painting Star 개발기 6 — 튜토리얼 설계, 1.1.0 업데이트, 안드로이드 준비" /><published>2026-04-26T00:00:00+09:00</published><updated>2026-04-26T00:00:00+09:00</updated><id>https://nninnis.github.io/painting-star/2026/04/26/painting-star-6-tutorial-and-update</id><content type="html" xml:base="https://nninnis.github.io/painting-star/2026/04/26/painting-star-6-tutorial-and-update/"><![CDATA[<p>출시하고 나서 가장 먼저 손을 댄 건 튜토리얼이었다.</p>

<hr />

<h2 id="왜-튜토리얼이-필요했나">왜 튜토리얼이 필요했나</h2>

<p>1.0.0에는 튜토리얼이 없었다. 스테이지 1~4가 사실상 가이드 역할을 하니까 충분하다고 생각했다.</p>

<p>틀렸다. 지인들한테 플레이해보라고 했더니 생각보다 많은 사람이 어렵다고 했다. 나한테는 당연한 규칙인데 처음 보는 사람한테는 전혀 당연하지 않았다. 색이 누적된다는 것, 한 번 지나간 칸은 다시 못 간다는 것, 별에 도달할 때 색이 정확해야 한다는 것 — 이걸 텍스트 없이 전달해야 한다.</p>

<hr />

<h2 id="튜토리얼-설계-원칙">튜토리얼 설계 원칙</h2>

<p>텍스트 설명은 안 쓰기로 했다. 글로벌 출시 기준이기도 하고, 팝업 읽는 유저는 드물다.</p>

<p>대신 <strong>고정 레벨 3단계</strong>로 규칙을 하나씩 가르친다.</p>

<div class="language-plaintext highlighter-rouge"><div class="highlight"><pre class="highlight"><code>Tutorial 1: 2×3, 빨강 구슬 하나 → 빨강 별
            → 색이 누적된다는 것을 가르침

Tutorial 2: 2×3, 빨강 → 빨강★ → 파랑 → 보라★
            → 두 색을 섞으면 새 색이 된다는 것

Tutorial 3: 3×3, 빨강 → 빨강★ → 파랑 → 보라★ → 흰 → 라벤더★
            → 세 가지 색 혼합, 흰색의 역할
</code></pre></div></div>

<p>세 레벨 전부 같은 뱀형(snake) 경로 패턴을 쓴다. 경로 모양 자체가 일관되어야 규칙 학습에 집중할 수 있다.</p>

<h3 id="고정-레벨-생성">고정 레벨 생성</h3>

<p>랜덤 생성과 별도로 <code class="language-plaintext highlighter-rouge">generateTutorialLevel(n: 1 | 2 | 3)</code>을 <code class="language-plaintext highlighter-rouge">PuzzleGenerator.ts</code>에 추가했다. 튜토리얼은 절차적 생성이 아니라 하드코딩.</p>

<div class="language-typescript highlighter-rouge"><div class="highlight"><pre class="highlight"><code><span class="k">export</span> <span class="kd">function</span> <span class="nf">generateTutorialLevel</span><span class="p">(</span><span class="nx">n</span><span class="p">:</span> <span class="mi">1</span> <span class="o">|</span> <span class="mi">2</span> <span class="o">|</span> <span class="mi">3</span><span class="p">):</span> <span class="nx">LevelData</span> <span class="p">{</span>
  <span class="k">if </span><span class="p">(</span><span class="nx">n</span> <span class="o">===</span> <span class="mi">1</span><span class="p">)</span> <span class="p">{</span>
    <span class="c1">// 2×3  path: (0,0)→(0,1)→(0,2)→(1,2)→(1,1)→(1,0)</span>
    <span class="c1">// R marble at start, r★ target at end</span>
    <span class="kd">const</span> <span class="nx">grid</span> <span class="o">=</span> <span class="nf">makeBlankGrid</span><span class="p">(</span><span class="mi">2</span><span class="p">,</span> <span class="mi">3</span><span class="p">);</span>
    <span class="nx">grid</span><span class="p">[</span><span class="mi">0</span><span class="p">][</span><span class="mi">0</span><span class="p">].</span><span class="kd">type</span> <span class="o">=</span> <span class="dl">'</span><span class="s1">R</span><span class="dl">'</span><span class="p">;</span> <span class="nx">grid</span><span class="p">[</span><span class="mi">0</span><span class="p">][</span><span class="mi">0</span><span class="p">].</span><span class="nx">source</span> <span class="o">=</span> <span class="nx">SOURCE_MAP</span><span class="p">[</span><span class="dl">'</span><span class="s1">R</span><span class="dl">'</span><span class="p">];</span>
    <span class="nx">grid</span><span class="p">[</span><span class="mi">1</span><span class="p">][</span><span class="mi">0</span><span class="p">].</span><span class="kd">type</span> <span class="o">=</span> <span class="dl">'</span><span class="s1">r</span><span class="dl">'</span><span class="p">;</span> <span class="nx">grid</span><span class="p">[</span><span class="mi">1</span><span class="p">][</span><span class="mi">0</span><span class="p">].</span><span class="nx">target</span> <span class="o">=</span> <span class="nx">TARGET_MAP</span><span class="p">[</span><span class="dl">'</span><span class="s1">r</span><span class="dl">'</span><span class="p">];</span>
    <span class="k">return</span> <span class="p">{</span>
      <span class="na">name</span><span class="p">:</span> <span class="dl">'</span><span class="s1">Tutorial 1</span><span class="dl">'</span><span class="p">,</span> <span class="na">rows</span><span class="p">:</span> <span class="mi">2</span><span class="p">,</span> <span class="na">cols</span><span class="p">:</span> <span class="mi">3</span><span class="p">,</span>
      <span class="nx">grid</span><span class="p">,</span>
      <span class="na">events</span><span class="p">:</span> <span class="p">[</span><span class="dl">'</span><span class="s1">R</span><span class="dl">'</span><span class="p">,</span> <span class="dl">'</span><span class="s1">r</span><span class="dl">'</span><span class="p">],</span>
      <span class="na">solutionPath</span><span class="p">:</span> <span class="p">[</span>
        <span class="p">{</span><span class="na">row</span><span class="p">:</span><span class="mi">0</span><span class="p">,</span><span class="na">col</span><span class="p">:</span><span class="mi">0</span><span class="p">},{</span><span class="na">row</span><span class="p">:</span><span class="mi">0</span><span class="p">,</span><span class="na">col</span><span class="p">:</span><span class="mi">1</span><span class="p">},{</span><span class="na">row</span><span class="p">:</span><span class="mi">0</span><span class="p">,</span><span class="na">col</span><span class="p">:</span><span class="mi">2</span><span class="p">},</span>
        <span class="p">{</span><span class="na">row</span><span class="p">:</span><span class="mi">1</span><span class="p">,</span><span class="na">col</span><span class="p">:</span><span class="mi">2</span><span class="p">},{</span><span class="na">row</span><span class="p">:</span><span class="mi">1</span><span class="p">,</span><span class="na">col</span><span class="p">:</span><span class="mi">1</span><span class="p">},{</span><span class="na">row</span><span class="p">:</span><span class="mi">1</span><span class="p">,</span><span class="na">col</span><span class="p">:</span><span class="mi">0</span><span class="p">},</span>
      <span class="p">],</span>
    <span class="p">};</span>
  <span class="p">}</span>
  <span class="c1">// ... Tutorial 2, 3 동일 패턴</span>
<span class="p">}</span>
</code></pre></div></div>

<hr />

<h2 id="온보딩-오버레이">온보딩 오버레이</h2>

<p>튜토리얼 레벨 시작 전에 한 번만 보여주는 오버레이를 넣었다. “손가락으로 드래그해서 경로를 그리세요” 류의 최소한의 조작 안내.</p>

<p><code class="language-plaintext highlighter-rouge">localStorage</code>로 표시 여부를 기록한다. 한 번 보면 다시 안 뜬다.</p>

<div class="language-typescript highlighter-rouge"><div class="highlight"><pre class="highlight"><code><span class="k">this</span><span class="p">.</span><span class="nx">tutorialPending</span> <span class="o">=</span> <span class="o">!</span><span class="nx">localStorage</span><span class="p">.</span><span class="nf">getItem</span><span class="p">(</span><span class="dl">'</span><span class="s1">tutorialSeen</span><span class="dl">'</span><span class="p">);</span>
<span class="k">if </span><span class="p">(</span><span class="o">!</span><span class="nx">localStorage</span><span class="p">.</span><span class="nf">getItem</span><span class="p">(</span><span class="dl">'</span><span class="s1">onboardingSeen</span><span class="dl">'</span><span class="p">))</span> <span class="k">this</span><span class="p">.</span><span class="nx">onboardingVisible</span> <span class="o">=</span> <span class="kc">true</span><span class="p">;</span>
</code></pre></div></div>

<p>버전이 올라갈 때(마이너 버전 기준) 기존 유저에게도 한 번 더 보여주도록 처리했다. 업데이트로 튜토리얼이 바뀌었을 수도 있으니까.</p>

<div class="language-typescript highlighter-rouge"><div class="highlight"><pre class="highlight"><code><span class="c1">// 버전 변경 감지 시 seen 플래그 초기화</span>
<span class="nx">localStorage</span><span class="p">.</span><span class="nf">removeItem</span><span class="p">(</span><span class="dl">'</span><span class="s1">tutorialSeen</span><span class="dl">'</span><span class="p">);</span>
<span class="nx">localStorage</span><span class="p">.</span><span class="nf">removeItem</span><span class="p">(</span><span class="dl">'</span><span class="s1">onboardingSeen</span><span class="dl">'</span><span class="p">);</span>
</code></pre></div></div>

<hr />

<h2 id="힌트-애니메이션-개선">힌트 애니메이션 개선</h2>

<p>기존 힌트는 스테이지 1~4에서 경로 전체를 한 번에 보여줬다. 이걸 두 가지로 나눴다.</p>

<ul>
  <li><strong>auto-hint</strong>: 드래그 시작 전에 경로 전체를 pulse로 표시 (sin 파형으로 밝기 변조)</li>
  <li><strong>버튼 힌트</strong>: 경로를 start → end로 순차 애니메이션 후 페이드아웃</li>
</ul>

<div class="language-typescript highlighter-rouge"><div class="highlight"><pre class="highlight"><code><span class="kd">const</span> <span class="nx">elapsed</span> <span class="o">=</span> <span class="k">this</span><span class="p">.</span><span class="nx">animTimer</span> <span class="o">-</span> <span class="k">this</span><span class="p">.</span><span class="nx">hintAnimStart</span><span class="p">;</span>
<span class="kd">const</span> <span class="nx">drawProgress</span> <span class="o">=</span> <span class="nb">Math</span><span class="p">.</span><span class="nf">min</span><span class="p">(</span><span class="mi">1</span><span class="p">,</span> <span class="nx">elapsed</span> <span class="o">/</span> <span class="k">this</span><span class="p">.</span><span class="nx">HINT_ANIM_DURATION</span><span class="p">);</span>
</code></pre></div></div>

<p>드래그를 시작하는 순간 auto-hint가 사라진다. 자연스럽게 손을 뗀다.</p>

<hr />

<h2 id="110-앱스토어-업데이트">1.1.0 앱스토어 업데이트</h2>

<p>위 튜토리얼 시스템을 올린 게 1.1.0이다. 리뷰 통과, 앱스토어에 올라가 있다.</p>

<hr />

<h2 id="111-세로모드-고정--ux-다듬기">1.1.1: 세로모드 고정 + UX 다듬기</h2>

<p>1.1.0 올리고 나서 바로 발견한 문제들을 수정해서 1.1.1을 만들었다. 지금 심사 대기 중이다.</p>

<h3 id="세로모드-고정">세로모드 고정</h3>

<p>가로로 돌리면 레이아웃이 깨진다. 처음부터 세로 전용 게임인데 이걸 강제하지 않았다.</p>

<p><code class="language-plaintext highlighter-rouge">Info.plist</code>에서 지원 방향을 세로만 남겼다.</p>

<div class="language-xml highlighter-rouge"><div class="highlight"><pre class="highlight"><code><span class="nt">&lt;key&gt;</span>UISupportedInterfaceOrientations<span class="nt">&lt;/key&gt;</span>
<span class="nt">&lt;array&gt;</span>
  <span class="nt">&lt;string&gt;</span>UIInterfaceOrientationPortrait<span class="nt">&lt;/string&gt;</span>
<span class="nt">&lt;/array&gt;</span>
<span class="nt">&lt;key&gt;</span>UISupportedInterfaceOrientations~ipad<span class="nt">&lt;/key&gt;</span>
<span class="nt">&lt;array&gt;</span>
  <span class="nt">&lt;string&gt;</span>UIInterfaceOrientationPortrait<span class="nt">&lt;/string&gt;</span>
  <span class="nt">&lt;string&gt;</span>UIInterfaceOrientationPortraitUpsideDown<span class="nt">&lt;/string&gt;</span>
<span class="nt">&lt;/array&gt;</span>
<span class="nt">&lt;key&gt;</span>UIRequiresFullScreen<span class="nt">&lt;/key&gt;</span>
<span class="nt">&lt;true/&gt;</span>
</code></pre></div></div>

<p>iPad는 UpsideDown도 허용했다. 홈 버튼 없는 iPad에서 UpsideDown이 없으면 리젝 사유가 될 수 있다.</p>

<h3 id="배너-광고-개선">배너 광고 개선</h3>

<p>기존 배너가 스플래시(로딩) 화면에서도 뜨는 문제가 있었다. <code class="language-plaintext highlighter-rouge">startBanner</code>를 별도로 분리해서 게임 화면에 진입한 후에만 배너가 로드되도록 수정했다.</p>

<p>로드 실패 시 재시도 로직도 추가했다. 최대 3회, 지수 백오프는 아니고 그냥 단순 재시도.</p>

<div class="language-typescript highlighter-rouge"><div class="highlight"><pre class="highlight"><code><span class="k">private</span> <span class="nx">retryCount</span> <span class="o">=</span> <span class="mi">0</span><span class="p">;</span>
<span class="k">private</span> <span class="k">readonly</span> <span class="nx">MAX_RETRY</span> <span class="o">=</span> <span class="mi">3</span><span class="p">;</span>

<span class="k">async</span> <span class="nf">onBannerFailedToLoad</span><span class="p">()</span> <span class="p">{</span>
  <span class="k">if </span><span class="p">(</span><span class="k">this</span><span class="p">.</span><span class="nx">retryCount</span> <span class="o">&lt;</span> <span class="k">this</span><span class="p">.</span><span class="nx">MAX_RETRY</span><span class="p">)</span> <span class="p">{</span>
    <span class="k">this</span><span class="p">.</span><span class="nx">retryCount</span><span class="o">++</span><span class="p">;</span>
    <span class="k">await</span> <span class="k">this</span><span class="p">.</span><span class="nf">showBanner</span><span class="p">();</span>
  <span class="p">}</span>
<span class="p">}</span>
</code></pre></div></div>

<h3 id="튜토리얼-ux-다듬기">튜토리얼 UX 다듬기</h3>

<ul>
  <li>튜토리얼 진행 중 하단 버튼(힌트, 설정 등) 숨김. 튜토리얼 중에 설정 열 이유가 없다.</li>
  <li>게임 화면에서 “Tutorial” 버튼 제거. 설정 패널 안에 Help + Tutorial을 같은 row 2컬럼으로 정리.</li>
  <li>힌트 카운트다운(3-2-1) 진행 중 힌트 버튼 재입력 방지. 연속 탭하면 카운트다운이 꼬였다.</li>
</ul>

<hr />

<h2 id="지금-상태와-다음-계획">지금 상태와 다음 계획</h2>

<table>
  <thead>
    <tr>
      <th>버전</th>
      <th>상태</th>
    </tr>
  </thead>
  <tbody>
    <tr>
      <td>1.0.0</td>
      <td>앱스토어 출시 완료</td>
    </tr>
    <tr>
      <td>1.1.0</td>
      <td>앱스토어 업데이트 완료 (튜토리얼)</td>
    </tr>
    <tr>
      <td>1.1.1</td>
      <td>심사 대기 중 (세로모드 고정, UX 개선)</td>
    </tr>
  </tbody>
</table>

<p>1.1.1이 통과되면 당분간 iOS 업데이트는 없다. 다음 목표는 안드로이드 출시다.</p>

<p>안드로이드는 1.1.1 기준으로 빌드한다. Capacitor가 코드 공유를 해주기는 하는데 AdMob App ID, RevenueCat 설정, 스토어 스크린샷은 전부 따로 준비해야 한다. 그 과정을 다음 편에 쓸 예정이다.</p>]]></content><author><name>nninnis</name></author><category term="painting-star" /><summary type="html"><![CDATA[출시 후 첫 업데이트: 튜토리얼 시스템 설계부터 세로모드 고정, 1.1.1 심사 대기까지]]></summary></entry><entry><title type="html">Painting Star 개발기 5 — 리젝, 원인 분석, 재심사 통과</title><link href="https://nninnis.github.io/painting-star/2026/04/23/painting-star-5-rejection-and-resubmission/" rel="alternate" type="text/html" title="Painting Star 개발기 5 — 리젝, 원인 분석, 재심사 통과" /><published>2026-04-23T00:00:00+09:00</published><updated>2026-04-23T00:00:00+09:00</updated><id>https://nninnis.github.io/painting-star/2026/04/23/painting-star-5-rejection-and-resubmission</id><content type="html" xml:base="https://nninnis.github.io/painting-star/2026/04/23/painting-star-5-rejection-and-resubmission/"><![CDATA[<p>심사 제출하고 다음날 리젝 메일이 왔다. 예상은 했다.</p>

<hr />

<h2 id="리젝-사유">리젝 사유</h2>

<p>Apple이 준 사유는 <strong>Guideline 5.1.2 — Legal — Privacy — Data Use and Sharing</strong>이었다.</p>

<p>요약하면 이렇다:</p>

<blockquote>
  <p>ATT(App Tracking Transparency) 권한 요청이 광고 SDK 초기화보다 먼저 이뤄져야 한다.</p>
</blockquote>

<p>내 코드는 ATT 요청을 JavaScript(WebView) 레벨에서 처리하고 있었다. 문제는 AdMob 네이티브 SDK가 WebView보다 먼저 초기화될 수 있다는 것. 타이밍이 보장이 안 된다.</p>

<p>Apple 가이드라인은 명확하다. 광고 SDK가 뜨기 전에 ATT가 먼저여야 한다.</p>

<hr />

<h2 id="원인">원인</h2>

<p><code class="language-plaintext highlighter-rouge">AdManager.ts</code>에 이런 코드가 있었다.</p>

<div class="language-typescript highlighter-rouge"><div class="highlight"><pre class="highlight"><code><span class="k">async</span> <span class="nf">initialize</span><span class="p">()</span> <span class="p">{</span>
  <span class="k">await</span> <span class="k">this</span><span class="p">.</span><span class="nf">requestTrackingAuthorization</span><span class="p">();</span> <span class="c1">// JS 레벨 ATT</span>
  <span class="k">await</span> <span class="nx">AdMob</span><span class="p">.</span><span class="nf">initialize</span><span class="p">({</span> <span class="na">testingDevices</span><span class="p">:</span> <span class="p">[]</span> <span class="p">});</span>
<span class="p">}</span>
</code></pre></div></div>

<p>JS에서 ATT를 요청하고, 그 다음 AdMob을 초기화하는 흐름이다. 얼핏 보면 맞아 보이는데 문제가 있다.</p>

<p>Capacitor WebView가 뜨는 시점에 이미 네이티브 AdMob SDK가 초기화를 시작할 수 있다. JS는 WebView가 완전히 로드된 다음에야 실행된다. 순서가 꼬인다.</p>

<hr />

<h2 id="해결">해결</h2>

<p>네이티브 레벨에서 처리해야 한다. <code class="language-plaintext highlighter-rouge">AppDelegate.swift</code>에 직접 넣었다.</p>

<div class="language-swift highlighter-rouge"><div class="highlight"><pre class="highlight"><code><span class="kd">import</span> <span class="kt">AppTrackingTransparency</span>

<span class="kd">func</span> <span class="nf">applicationDidBecomeActive</span><span class="p">(</span><span class="n">_</span> <span class="nv">application</span><span class="p">:</span> <span class="kt">UIApplication</span><span class="p">)</span> <span class="p">{</span>
    <span class="k">if</span> <span class="k">#available</span><span class="p">(</span><span class="n">iOS</span> <span class="mi">14</span><span class="p">,</span> <span class="o">*</span><span class="p">)</span> <span class="p">{</span>
        <span class="kt">ATTrackingManager</span><span class="o">.</span><span class="n">requestTrackingAuthorization</span> <span class="p">{</span> <span class="n">status</span> <span class="k">in</span>
            <span class="c1">// 결과와 무관하게 AdMob은 이후에 초기화됨</span>
        <span class="p">}</span>
    <span class="p">}</span>
<span class="p">}</span>
</code></pre></div></div>

<p><code class="language-plaintext highlighter-rouge">applicationDidBecomeActive</code>는 앱이 포그라운드로 올라오는 시점에 호출된다. WebView 로드나 AdMob 초기화보다 먼저 실행된다. 이게 Google이 공식 권장하는 방식이다.</p>

<p><code class="language-plaintext highlighter-rouge">Info.plist</code>에 <code class="language-plaintext highlighter-rouge">NSUserTrackingUsageDescription</code>은 이미 있었으니 그대로 뒀다.</p>

<p>JS 쪽 ATT 로직은 삭제하지 않고 상태 확인만 하도록 남겼다. 네이티브가 이미 처리했으니 중복 요청은 안 된다.</p>

<hr />

<h2 id="재제출-프로세스">재제출 프로세스</h2>

<h3 id="빌드-번호-올리기">빌드 번호 올리기</h3>

<p>같은 버전으로 재제출하려면 빌드 번호를 올려야 한다.</p>

<p>Xcode → TARGETS → App → General → Identity</p>
<ul>
  <li>Version: <code class="language-plaintext highlighter-rouge">1.0</code> 유지</li>
  <li>Build: <code class="language-plaintext highlighter-rouge">1</code> → <code class="language-plaintext highlighter-rouge">2</code></li>
</ul>

<p>그다음 Product → Archive → Distribute App.</p>

<h3 id="review-notes-작성">Review Notes 작성</h3>

<p>재제출할 때 Review Notes를 꼭 썼다. 심사관한테 뭘 수정했는지 설명하는 칸이다. 안 써도 되지만 쓰는 게 낫다.</p>

<div class="language-plaintext highlighter-rouge"><div class="highlight"><pre class="highlight"><code>The App Tracking Transparency permission dialog appears immediately
when the app becomes active for the first time, before any ads are loaded.

Implementation: ATT is requested in applicationDidBecomeActive in
AppDelegate.swift using ATTrackingManager.requestTrackingAuthorization,
before the AdMob SDK initialization.
</code></pre></div></div>

<p>기술적으로 정확하게 쓴다. 심사관도 사람이고, 무엇을 수정했는지 명확히 알면 통과가 빠르다.</p>

<hr />

<h2 id="심사-통과">심사 통과</h2>

<p>재제출 후 약 24시간 만에 통과됐다.</p>

<p>리젝 받고 원인 파악해서 수정하고 재제출까지 하루도 안 걸렸다. Apple이 리젝 사유를 구체적으로 알려주기 때문에 방향은 명확하다. 겁먹을 필요 없다. 틀리면 수정하면 된다.</p>

<hr />

<h2 id="심사-통과-후-istesting-제거">심사 통과 후: isTesting 제거</h2>

<p>심사 중에는 <code class="language-plaintext highlighter-rouge">AdManager.ts</code>에 <code class="language-plaintext highlighter-rouge">isTesting: true</code>가 세 군데 있었다. 심사관한테 테스트 배너 보이면 안 되니까 켜뒀던 거다.</p>

<p>통과하자마자 전부 제거하고 Build 3으로 다시 올렸다.</p>

<div class="language-typescript highlighter-rouge"><div class="highlight"><pre class="highlight"><code><span class="c1">// 제거 전</span>
<span class="k">await</span> <span class="nx">AdMob</span><span class="p">.</span><span class="nf">showBanner</span><span class="p">({</span>
  <span class="na">adId</span><span class="p">:</span> <span class="nx">BANNER_ID</span><span class="p">,</span>
  <span class="na">isTesting</span><span class="p">:</span> <span class="kc">true</span><span class="p">,</span> <span class="c1">// ← 이거</span>
<span class="p">});</span>

<span class="c1">// 제거 후</span>
<span class="k">await</span> <span class="nx">AdMob</span><span class="p">.</span><span class="nf">showBanner</span><span class="p">({</span>
  <span class="na">adId</span><span class="p">:</span> <span class="nx">BANNER_ID</span><span class="p">,</span>
<span class="p">});</span>
</code></pre></div></div>

<p>실제 광고가 붙기 시작한 건 이 버전부터다.</p>]]></content><author><name>nninnis</name></author><category term="painting-star" /><summary type="html"><![CDATA[ATT 구현 오류로 앱스토어 리젝당한 과정과 AppDelegate 레벨에서 해결한 방법]]></summary></entry><entry><title type="html">Painting Star 개발기 1 — 프로토타입에서 Phaser 앱으로</title><link href="https://nninnis.github.io/painting-star/2026/04/22/painting-star-1-prototype-to-phaser/" rel="alternate" type="text/html" title="Painting Star 개발기 1 — 프로토타입에서 Phaser 앱으로" /><published>2026-04-22T00:00:00+09:00</published><updated>2026-04-22T00:00:00+09:00</updated><id>https://nninnis.github.io/painting-star/2026/04/22/painting-star-1-prototype-to-phaser</id><content type="html" xml:base="https://nninnis.github.io/painting-star/2026/04/22/painting-star-1-prototype-to-phaser/"><![CDATA[<p>아이디어를 검증할 때 가장 빠른 방법은 단일 HTML 파일이다. 프레임워크도 없고, 빌드 툴도 없고, <code class="language-plaintext highlighter-rouge">&lt;script&gt;</code> 하나에 전부 때려 넣는다. Painting Star도 그렇게 시작했다.</p>

<h2 id="게임-컨셉">게임 컨셉</h2>

<p>모든 칸을 한 붓으로 방문하되, 색 구슬을 지나면 붓 색이 누적되고 별 칸에 정확한 혼합색으로 도달해야 클리어하는 퍼즐 게임이다. 색은 물감처럼 더하기만 되고 빼지지 않는다. 경로의 순서가 곧 퍼즐의 해답이다.</p>

<p>단순한 규칙인데 생각보다 퍼즐 깊이가 나왔다. <code class="language-plaintext highlighter-rouge">colorpath.html</code> 하나짜리 파일에서 게임의 핵심 루프를 확인했다.</p>

<h2 id="마이그레이션-결정">마이그레이션 결정</h2>

<p>프로토타입이 동작하자마자 구조적인 문제가 보였다. 1,100줄짜리 IIFE 안에 색 시스템, 레벨 생성, 렌더링, 입력 처리가 전부 섞여 있었다. 모바일 앱으로 출시하려면 어차피 손봐야 하는 부분이었다.</p>

<p>선택지는 두 가지였다.</p>

<ol>
  <li>바닐라 JS 구조 유지, Capacitor만 씌우기</li>
  <li>Phaser 3 + TypeScript로 재작성</li>
</ol>

<p>첫 번째가 공수는 적다. 하지만 Canvas 2D를 직접 다루는 코드가 이미 복잡해진 상태에서 더 키우는 건 나중에 더 힘들어진다는 걸 경험으로 알고 있었다. Phaser를 선택했다.</p>

<h2 id="구조-설계">구조 설계</h2>

<p>마이그레이션 전에 기능 단위로 파일을 나눴다.</p>

<table>
  <thead>
    <tr>
      <th>파일</th>
      <th>역할</th>
    </tr>
  </thead>
  <tbody>
    <tr>
      <td><code class="language-plaintext highlighter-rouge">ColorSystem.ts</code></td>
      <td>색 벡터 모델, 혼합 로직</td>
    </tr>
    <tr>
      <td><code class="language-plaintext highlighter-rouge">PuzzleGenerator.ts</code></td>
      <td>해밀턴 경로 생성, 이벤트 배치</td>
    </tr>
    <tr>
      <td><code class="language-plaintext highlighter-rouge">DifficultyManager.ts</code></td>
      <td>스테이지별 파라미터</td>
    </tr>
    <tr>
      <td><code class="language-plaintext highlighter-rouge">GameScene.ts</code></td>
      <td>게임 루프, 렌더링, 입력 처리</td>
    </tr>
    <tr>
      <td><code class="language-plaintext highlighter-rouge">AdManager.ts</code></td>
      <td>광고 초기화, 레이아웃 조정</td>
    </tr>
  </tbody>
</table>

<p>Phaser를 쓰면서도 실제 그리기는 Canvas 2D로 직접 한다. Phaser의 display list에 <code class="language-plaintext highlighter-rouge">CanvasDrawer</code> 오브젝트를 올려두고, render 단계에서 Canvas context를 받아 직접 드로잉하는 방식이다. Phaser 내장 게임 오브젝트 대신 Canvas API를 그대로 쓰는 이유는 프로토타입에서 작성한 드로잉 코드를 최대한 재활용하기 위해서다.</p>

<h2 id="절차적-레벨-생성">절차적 레벨 생성</h2>

<p>레벨을 하드코딩하지 않고 전부 생성한다. 핵심은 두 가지다.</p>

<p><strong>해밀턴 경로 생성</strong>: Warnsdorff 휴리스틱으로 모든 칸을 한 번씩 방문하는 경로를 찾는다. 실패하면 DFS 백트래킹으로 폴백한다.</p>

<p><strong>부분집합 체인</strong>: 다중 별 스테이지에서 각 별의 목표 색이 체인을 이뤄야 한다. <code class="language-plaintext highlighter-rouge">{r} ⊂ {r,y} ⊂ {r,y,b}</code> 같은 구조. 색은 누적만 되기 때문에 순서가 잘못된 별 조합은 수학적으로 클리어 불가다. 생성 단계에서 이를 강제한다.</p>

<p>스테이지가 올라갈수록 그리드가 커지고, 별 개수가 늘고, 장애물이 추가된다. 장애물은 체커보드 패리티와 연결성 제약을 통과해야만 배치된다. 그렇지 않으면 해밀턴 경로 자체가 불가능한 그리드가 나온다.</p>

<h2 id="결과">결과</h2>

<p><code class="language-plaintext highlighter-rouge">colorpath.html</code>은 레거시로 남겨두고 건드리지 않는다. Phaser 앱은 <code class="language-plaintext highlighter-rouge">app/</code> 폴더에 분리되어 있다. 마이그레이션 후 기능은 동일하지만 코드가 다룰 수 있는 단위로 쪼개졌다. 다음 단계는 이걸 실제 iOS 앱으로 패키징하는 것이었다.</p>]]></content><author><name>nninnis</name></author><category term="painting-star" /><summary type="html"><![CDATA[단일 HTML 파일로 시작한 색 혼합 퍼즐 게임을 Phaser 3 + TypeScript 구조로 마이그레이션한 과정]]></summary></entry><entry><title type="html">Painting Star 개발기 2 — Capacitor로 iOS 앱 만들기</title><link href="https://nninnis.github.io/painting-star/2026/04/22/painting-star-2-capacitor-ios/" rel="alternate" type="text/html" title="Painting Star 개발기 2 — Capacitor로 iOS 앱 만들기" /><published>2026-04-22T00:00:00+09:00</published><updated>2026-04-22T00:00:00+09:00</updated><id>https://nninnis.github.io/painting-star/2026/04/22/painting-star-2-capacitor-ios</id><content type="html" xml:base="https://nninnis.github.io/painting-star/2026/04/22/painting-star-2-capacitor-ios/"><![CDATA[<p>웹앱을 모바일 앱으로 바꾸는 방법은 여러 가지다. React Native처럼 처음부터 모바일 전용으로 짜는 방법, Cordova/Ionic 같은 하이브리드 프레임워크를 쓰는 방법, 그리고 Capacitor. 이미 Phaser로 돌아가는 게임이 있었으니 선택지는 좁았다. Capacitor로 웹앱을 그냥 WKWebView에 올리는 것.</p>

<h2 id="capacitor-셋업">Capacitor 셋업</h2>

<p>설정 자체는 단순하다.</p>

<div class="language-bash highlighter-rouge"><div class="highlight"><pre class="highlight"><code>npm <span class="nb">install</span> @capacitor/core @capacitor/cli @capacitor/ios
npx cap init
npx cap add ios
</code></pre></div></div>

<p><code class="language-plaintext highlighter-rouge">capacitor.config.ts</code>에 번들 ID와 웹 디렉토리만 지정하면 된다.</p>

<div class="language-ts highlighter-rouge"><div class="highlight"><pre class="highlight"><code><span class="k">import</span> <span class="p">{</span> <span class="nx">CapacitorConfig</span> <span class="p">}</span> <span class="k">from</span> <span class="dl">'</span><span class="s1">@capacitor/cli</span><span class="dl">'</span><span class="p">;</span>

<span class="kd">const</span> <span class="nx">config</span><span class="p">:</span> <span class="nx">CapacitorConfig</span> <span class="o">=</span> <span class="p">{</span>
  <span class="na">appId</span><span class="p">:</span> <span class="dl">'</span><span class="s1">com.hsc.colorpath</span><span class="dl">'</span><span class="p">,</span>
  <span class="na">appName</span><span class="p">:</span> <span class="dl">'</span><span class="s1">Painting Star</span><span class="dl">'</span><span class="p">,</span>
  <span class="na">webDir</span><span class="p">:</span> <span class="dl">'</span><span class="s1">dist</span><span class="dl">'</span><span class="p">,</span>
  <span class="na">ios</span><span class="p">:</span> <span class="p">{</span>
    <span class="na">contentInset</span><span class="p">:</span> <span class="dl">'</span><span class="s1">always</span><span class="dl">'</span><span class="p">,</span>
  <span class="p">},</span>
<span class="p">};</span>
</code></pre></div></div>

<p>이후 워크플로우는 항상 같다.</p>

<div class="language-bash highlighter-rouge"><div class="highlight"><pre class="highlight"><code>npm run build
npx cap <span class="nb">sync </span>ios
npx cap open ios   <span class="c"># Xcode 열림</span>
</code></pre></div></div>

<p><code class="language-plaintext highlighter-rouge">cap sync</code>가 <code class="language-plaintext highlighter-rouge">dist/</code>를 iOS 프로젝트 안으로 복사하고 플러그인도 업데이트한다. 코드 바꿀 때마다 이 세 줄을 실행해야 한다는 게 처음엔 불편했는데 금방 익숙해졌다.</p>

<h2 id="번들-id-문제">번들 ID 문제</h2>

<p>처음엔 번들 ID를 <code class="language-plaintext highlighter-rouge">com.hsc.colorpath</code>로 설정했다. 그런데 앱 이름이 ‘Painting Star’인데 번들 ID가 colorpath면 나중에 관리가 꼬일 것 같아서 <code class="language-plaintext highlighter-rouge">com.hsc.paintingstar</code>로 바꿨다.</p>

<p>번들 ID를 바꾸면 건드려야 하는 곳이 여러 군데다.</p>

<ul>
  <li><code class="language-plaintext highlighter-rouge">capacitor.config.ts</code>의 <code class="language-plaintext highlighter-rouge">appId</code></li>
  <li>Xcode의 Signing &amp; Capabilities → Bundle Identifier</li>
  <li><code class="language-plaintext highlighter-rouge">Info.plist</code>의 <code class="language-plaintext highlighter-rouge">CFBundleIdentifier</code></li>
  <li>AdMob, RevenueCat 같은 서드파티 설정</li>
</ul>

<p>특히 AdMob <code class="language-plaintext highlighter-rouge">Info.plist</code>에 박혀 있는 <code class="language-plaintext highlighter-rouge">GADApplicationIdentifier</code>를 놓치면 광고 초기화할 때 크래시가 난다. 체크리스트 없이 감으로 바꾸다가 한 번 놓쳤다.</p>

<h2 id="화면-크기-적응">화면 크기 적응</h2>

<p>Phaser를 초기화할 때 고정 해상도(420×740)로 시작했다. 웹에서는 CSS scale로 맞추면 되지만, 실제 기기에서는 노치와 홈 인디케이터 영역을 고려해야 한다.</p>

<p>Safe Area를 무시하면 버튼이 홈 인디케이터에 걸린다. <code class="language-plaintext highlighter-rouge">WKWebView</code>의 <code class="language-plaintext highlighter-rouge">viewport-fit=cover</code>와 CSS <code class="language-plaintext highlighter-rouge">env(safe-area-inset-*)</code> 변수를 조합해서 캔버스 레이아웃을 잡았다.</p>

<p>결국 고정 해상도를 버리고 <code class="language-plaintext highlighter-rouge">window.innerWidth / window.innerHeight</code>로 동적 계산하는 방식으로 전환했다. Phaser 게임 크기를 기기 화면에 맞게 초기화하고, 내부 UI 좌표도 전부 비율로 계산한다. 작업량이 늘어났지만 어차피 해야 하는 작업이었다.</p>

<h2 id="스플래시-스크린">스플래시 스크린</h2>

<p>Capacitor에는 스플래시 스크린 플러그인이 있다. 2732×2732 png를 준비해서 <code class="language-plaintext highlighter-rouge">Assets.xcassets</code>에 넣으면 된다.</p>

<p>문제는 Xcode가 스플래시 이미지를 세 장 요구한다는 것이다 — 1x, 2x, 3x. 결국 같은 이미지를 세 벌 준비했다. 앱 심사 전에 스플래시 이미지를 제거하는 방향으로 정리했다. 앱 로딩이 빠르면 스플래시가 굳이 필요 없다.</p>

<h2 id="실제-기기-테스트">실제 기기 테스트</h2>

<p>시뮬레이터와 실제 기기는 다르다. 시뮬레이터에서 멀쩡하게 돌던 게 실제 폰에서 다르게 보이는 경우가 여러 번 있었다.</p>

<p>가장 크게 달랐던 건 터치 응답이다. 시뮬레이터에서는 마우스 클릭으로 테스트하니까 실제 손가락 드래그의 느낌을 알 수 없다. 경로 그리기가 핵심 인터랙션인 게임이라 실기 테스트가 필수였다. 드래그 감도와 판정 범위를 실기에서 여러 번 수정했다.</p>

<p>Xcode에서 실기 빌드하려면 Apple Developer Program($99/년) 가입이 필요하다. 가입 전에는 7일짜리 무료 프로비저닝으로 본인 기기에만 설치할 수 있다. 개발 중에는 이걸로 충분하다.</p>

<h2 id="admob-배너와-레이아웃-충돌">AdMob 배너와 레이아웃 충돌</h2>

<p>배너 광고가 화면 하단에 붙으면 게임 버튼과 겹친다. AdMob은 배너 크기를 비동기로 알려주는데, <code class="language-plaintext highlighter-rouge">BannerAdPluginEvents.SizeChanged</code> 이벤트로 높이를 받아서 CSS 변수로 박아두는 방식을 썼다.</p>

<div class="language-ts highlighter-rouge"><div class="highlight"><pre class="highlight"><code><span class="nx">AdMob</span><span class="p">.</span><span class="nf">addListener</span><span class="p">(</span><span class="nx">BannerAdPluginEvents</span><span class="p">.</span><span class="nx">SizeChanged</span><span class="p">,</span> <span class="p">(</span><span class="nx">info</span><span class="p">:</span> <span class="p">{</span> <span class="nl">height</span><span class="p">:</span> <span class="kr">number</span> <span class="p">})</span> <span class="o">=&gt;</span> <span class="p">{</span>
  <span class="nb">document</span><span class="p">.</span><span class="nx">documentElement</span><span class="p">.</span><span class="nx">style</span><span class="p">.</span><span class="nf">setProperty</span><span class="p">(</span><span class="dl">'</span><span class="s1">--banner-height</span><span class="dl">'</span><span class="p">,</span> <span class="s2">`</span><span class="p">${</span><span class="nx">info</span><span class="p">.</span><span class="nx">height</span><span class="p">}</span><span class="s2">px`</span><span class="p">);</span>
<span class="p">});</span>
</code></pre></div></div>

<p>게임 캔버스는 <code class="language-plaintext highlighter-rouge">--banner-height</code>만큼 위쪽으로 올라간다. 배너가 없을 때(광고 제거 구매자)는 변수를 0으로 세팅하면 레이아웃이 원래대로 돌아온다. 단순한 방법인데 깔끔하게 동작했다.</p>

<h2 id="결과">결과</h2>

<p>Capacitor는 웹 기술 스택을 그대로 유지하면서 네이티브 앱을 만들 수 있는 가장 마찰 없는 방법이다. 플러그인 에코시스템도 충분하고, iOS/Android 동시 타겟도 코드베이스 하나로 커버된다.</p>

<p>다음 단계는 이 앱에 광고와 인앱결제를 붙이는 것이었다.</p>]]></content><author><name>nninnis</name></author><category term="painting-star" /><summary type="html"><![CDATA[Phaser 웹앱을 Capacitor로 감싸서 실제 iPhone에서 돌아가게 하는 과정과 삽질들]]></summary></entry><entry><title type="html">Painting Star 개발기 3 — AdMob과 RevenueCat 연동기</title><link href="https://nninnis.github.io/painting-star/2026/04/22/painting-star-3-admob-revenuecat/" rel="alternate" type="text/html" title="Painting Star 개발기 3 — AdMob과 RevenueCat 연동기" /><published>2026-04-22T00:00:00+09:00</published><updated>2026-04-22T00:00:00+09:00</updated><id>https://nninnis.github.io/painting-star/2026/04/22/painting-star-3-admob-revenuecat</id><content type="html" xml:base="https://nninnis.github.io/painting-star/2026/04/22/painting-star-3-admob-revenuecat/"><![CDATA[<p>무료 게임 수익화는 두 가지로 귀결된다. 광고와 인앱결제. AdMob으로 광고를 붙이고, RevenueCat으로 ‘광고 제거’ 인앱결제를 연동하기로 했다.</p>

<h2 id="admob-설정">AdMob 설정</h2>

<p><code class="language-plaintext highlighter-rouge">@capacitor-community/admob</code> 플러그인을 썼다. 배너, 전면광고, 보상형 광고 세 가지를 연동했다.</p>

<table>
  <thead>
    <tr>
      <th>광고 종류</th>
      <th>노출 시점</th>
    </tr>
  </thead>
  <tbody>
    <tr>
      <td>배너</td>
      <td>항상 하단 표시</td>
    </tr>
    <tr>
      <td>전면광고</td>
      <td>클리어 10회 또는 실패 3회마다</td>
    </tr>
    <tr>
      <td>보상형 광고</td>
      <td>힌트(스테이지당 1회 무료 이후) / 퍼즐 재생성(3회 무료 이후)</td>
    </tr>
  </tbody>
</table>

<p>보상형 광고는 강제 노출이 아니라 사용자가 원할 때 보는 방식이라 거부감이 덜하다. 힌트와 재생성 버튼에 gold 테두리와 ▶ 배지를 붙여서 광고가 필요하다는 걸 미리 알려줬다.</p>

<h3 id="att-권한-처리">ATT 권한 처리</h3>

<p>iOS 14부터 광고 추적 동의(ATT)를 받지 않으면 개인화 광고를 못 쓴다. AdMob 초기화 전에 반드시 요청해야 한다. 순서가 틀리면 ATT 팝업이 뜨지 않거나 무효 처리된다.</p>

<div class="language-ts highlighter-rouge"><div class="highlight"><pre class="highlight"><code><span class="kd">const</span> <span class="p">{</span> <span class="nx">status</span> <span class="p">}</span> <span class="o">=</span> <span class="k">await</span> <span class="nx">AppTrackingTransparency</span><span class="p">.</span><span class="nf">getStatus</span><span class="p">();</span>
<span class="k">if </span><span class="p">(</span><span class="nx">status</span> <span class="o">===</span> <span class="dl">'</span><span class="s1">notDetermined</span><span class="dl">'</span><span class="p">)</span> <span class="p">{</span>
  <span class="k">await</span> <span class="nx">AppTrackingTransparency</span><span class="p">.</span><span class="nf">requestPermission</span><span class="p">();</span>
<span class="p">}</span>
<span class="k">await</span> <span class="nx">AdMob</span><span class="p">.</span><span class="nf">initialize</span><span class="p">({});</span>
</code></pre></div></div>

<p><code class="language-plaintext highlighter-rouge">capacitor-plugin-app-tracking-transparency</code> 플러그인이 필요하고, <code class="language-plaintext highlighter-rouge">Info.plist</code>에 <code class="language-plaintext highlighter-rouge">NSUserTrackingUsageDescription</code> 키도 추가해야 한다. 이걸 빠뜨리면 App Store 심사에서 리젝된다.</p>

<h3 id="istesting-플래그">isTesting 플래그</h3>

<p>개발 중에는 <code class="language-plaintext highlighter-rouge">isTesting: true</code>를 써야 한다. 실제 광고를 클릭해서 수익을 발생시키면 AdMob 정책 위반이다.</p>

<div class="language-ts highlighter-rouge"><div class="highlight"><pre class="highlight"><code><span class="kd">const</span> <span class="nx">options</span><span class="p">:</span> <span class="nx">BannerAdOptions</span> <span class="o">=</span> <span class="p">{</span>
  <span class="na">adId</span><span class="p">:</span> <span class="nx">AD_IDS</span><span class="p">.</span><span class="nx">banner</span><span class="p">,</span>
  <span class="na">adSize</span><span class="p">:</span> <span class="nx">BannerAdSize</span><span class="p">.</span><span class="nx">ADAPTIVE_BANNER</span><span class="p">,</span>
  <span class="na">position</span><span class="p">:</span> <span class="nx">BannerAdPosition</span><span class="p">.</span><span class="nx">BOTTOM_CENTER</span><span class="p">,</span>
  <span class="na">isTesting</span><span class="p">:</span> <span class="kc">true</span><span class="p">,</span> <span class="c1">// AdMob 승인 전까지 유지</span>
<span class="p">};</span>
</code></pre></div></div>

<p>AdMob 계정 승인은 앱 출시 후 트래픽이 발생해야 이루어진다. 출시 전에는 테스트 광고만 볼 수 있다.</p>

<h2 id="revenuecat-연동">RevenueCat 연동</h2>

<p>StoreKit을 직접 다루지 않고 RevenueCat을 쓰기로 한 이유는 간단하다. 구매 복원, 영수증 검증, 기기 간 동기화를 처음부터 직접 구현하는 게 생각보다 복잡하다. RevenueCat이 이걸 대신 해준다.</p>

<h3 id="api-키-혼동">API 키 혼동</h3>

<p>RevenueCat에는 API 키가 두 종류 있다. App Store Connect API 키(<code class="language-plaintext highlighter-rouge">SubscriptionKey_*.p8</code>)와 RevenueCat 자체 SDK 키(<code class="language-plaintext highlighter-rouge">appl_*</code>). 처음에 이 둘을 혼동해서 시간을 날렸다.</p>

<ul>
  <li><strong>App Store Connect API 키</strong>: RevenueCat 대시보드에서 앱 구성 시 등록. 인앱결제 상품 정보를 App Store에서 가져오는 데 쓰인다.</li>
  <li><strong>RevenueCat SDK 키</strong>: 앱 코드에 박는 키. <code class="language-plaintext highlighter-rouge">Purchases.configure()</code>에 넣는 <code class="language-plaintext highlighter-rouge">appl_</code> 로 시작하는 문자열.</li>
</ul>

<p>App Store Connect에서 키를 만들 때는 <strong>In-App Purchase</strong> 유형으로 만들어야 한다. 일반 API 키(<code class="language-plaintext highlighter-rouge">AuthKey_*.p8</code>)와 파일 이름 형식이 다르다. <code class="language-plaintext highlighter-rouge">SubscriptionKey_XXXXXXXX.p8</code>이면 맞는 키다.</p>

<h3 id="sandbox-테스트-불통">Sandbox 테스트 불통</h3>

<p>인앱결제를 연동하고 실기 테스트를 해봤는데 “상품을 찾을 수 없습니다”가 계속 떴다. 로그를 보면 RevenueCat은 연결되는데 상품 목록이 비어있다.</p>

<p>원인을 찾는 데 시간이 걸렸다. App Store Connect에서 인앱결제 상품 상태가 <code class="language-plaintext highlighter-rouge">READY_TO_SUBMIT</code>인 상태에서는 Sandbox StoreKit이 상품을 반환하지 않는다는 게 핵심이었다. 앱을 App Store Connect에 한 번 업로드해야 상품 상태가 <code class="language-plaintext highlighter-rouge">WAITING_FOR_REVIEW</code>로 바뀌고 그때부터 Sandbox 테스트가 가능하다.</p>

<p>즉, 실제로 앱을 심사 제출하기 전까지는 인앱결제 Sandbox 테스트가 안 된다. 출시 전에 결제 플로우를 완전히 검증할 수 없다는 뜻이다.</p>

<h3 id="구매-복원">구매 복원</h3>

<p>RevenueCat은 <code class="language-plaintext highlighter-rouge">restorePurchases()</code>를 제공한다. Apple ID 단위로 구매 이력을 서버에서 조회해서 복원한다. 기기를 바꾸거나 앱을 재설치해도 복원된다.</p>

<div class="language-ts highlighter-rouge"><div class="highlight"><pre class="highlight"><code><span class="kd">const</span> <span class="nx">info</span> <span class="o">=</span> <span class="k">await</span> <span class="nx">Purchases</span><span class="p">.</span><span class="nf">restorePurchases</span><span class="p">();</span>
<span class="kd">const</span> <span class="nx">entitlement</span> <span class="o">=</span> <span class="nx">info</span><span class="p">.</span><span class="nx">entitlements</span><span class="p">.</span><span class="nx">active</span><span class="p">[</span><span class="dl">'</span><span class="s1">remove_ads</span><span class="dl">'</span><span class="p">];</span>
<span class="k">if </span><span class="p">(</span><span class="nx">entitlement</span><span class="p">)</span> <span class="p">{</span>
  <span class="nx">localStorage</span><span class="p">.</span><span class="nf">setItem</span><span class="p">(</span><span class="dl">'</span><span class="s1">adsRemoved</span><span class="dl">'</span><span class="p">,</span> <span class="dl">'</span><span class="s1">true</span><span class="dl">'</span><span class="p">);</span>
<span class="p">}</span>
</code></pre></div></div>

<p>localStorage는 캐시 역할만 한다. 진실의 원천은 RevenueCat 서버(Apple ID 기반)다. 앱 시작 시 <code class="language-plaintext highlighter-rouge">getCustomerInfo()</code>를 호출해서 동기화한다.</p>

<h2 id="광고-전략-설계">광고 전략 설계</h2>

<p>처음엔 전면광고 위주로 설계했다가 Rewarded Ad 중심으로 바꿨다. 이유는 세 가지다.</p>

<ol>
  <li>전면광고는 타이밍이 나쁘면 사용자 경험을 깎는다</li>
  <li>Rewarded Ad는 사용자가 선택한다 — 거부감이 다르다</li>
  <li>힌트/재생성 같은 “편의 기능”과 궁합이 잘 맞는다</li>
</ol>

<p><code class="language-plaintext highlighter-rouge">adsRemoved</code> 구매자는 전부 무제한 무료다. 광고 없이 플레이하고 싶은 사람은 한 번 구매하면 된다.</p>

<h2 id="결과">결과</h2>

<p>AdMob + RevenueCat 조합은 무료 게임 수익화의 사실상 표준이다. 각각 독립적으로 초기화되고 간섭이 없다. Sandbox 테스트 제약은 불편하지만, 이건 Apple의 정책이라 어쩔 수 없다. 실제 결제 동작 확인은 앱 승인 후로 미뤘다.</p>]]></content><author><name>nninnis</name></author><category term="painting-star" /><summary type="html"><![CDATA[광고 수익화와 인앱결제를 붙이면서 겪은 시행착오들 — test 키 혼동, Sandbox 불통, ATT 권한 처리]]></summary></entry></feed>